HyperCX NFV
Overview
Network functions virtualization (NFV) is the process of decoupling network functions from hardware and running them on a software platform. It is a different although could be a complementary approach to software-defined networking (SDN) for network management. While both manage networks, they rely on different methods. While SDN separates the control and forwarding planes to offer a centralized view of the network, NFV primarily focuses on optimizing the network services themselves. It is a key part of cloud computing, data center networking, SD-WAN, and many others.
NFV began when service providers attempted to speed up deployment of new network services in order to advance their revenue and growth plans. Developers found that proprietary hardware-based appliances limited their ability to achieve these goals. They looked to standard IT virtualization technologies and found that virtualizing network functions accelerated service dynamics and provisioning.
HyperCX NFV is designed to easily provide VNFs (Virtual Network Functions) to HyperCX cloud users. It is not designed to be a competitor of advanced, carrier-grade NFV architectures like MANO, or be feature-rich like software firewalls like PfSense. Instead, simplicity and easy of use are key design goals while maintaining a good performance for small and medium cloud deployments.
HyperCX Key Features:
HyperCX NFV has been pre-loaded with the following features:
-
HA support using VRRP protocol through keepalived.
-
Routing among connected Virtual Networks.
-
VPN support leveraging OpenVPN.
-
Support for masquerade on private networks.
-
L4 and L7 load balancing features.
-
Site to Site (S2S) VPN support leveraging StronSwang.
-
DDoS protection.
All of these features can be used at the same time on a single instance, or only one per HyperCX NFV instance. Next it will be shown how to deploy a basic NFV appliance and after that each feature will be described.
Note
HyperCX NFV is deployed and managed like a Virtual Router. In this document, the term Virtual Router or vRouter can also be used to refer to HyperCX NFV instances.
Obtaining the NFV appliance
NFV appliances are available since HyperCX 10.5.2 and can easily be obtained on the marketplace. The appliance name on the marketplace is HyperCX_NFV and the version can be seen on the details. More information on how to download it can be found here.
Upgrading the NFV appliance
The version of the HyperCX NFV appliance that is being used on the cluster can be seen when login in to any VM instance via SSH or VNC
 _   _                        ______  __  _   _ _______     __
| | | |_   _ _ __   ___ _ __ / ___\ \/ / | \ | |  ___\ \   / /
| |_| | | | | '_ \ / _ \ '__| |    \  /  |  \| | |_   \ \ / /
|  _  | |_| | |_) |  __/ |  | |___ /  \  | |\  |  _|   \ V /
|_| |_|\__, | .__/ \___|_|   \____/_/\_\ |_| \_|_|      \_/
       |___/|_|
VERSION: 2.2.1    <----
To check the version of the appliance in the marketplace, simply head over to the appliance section under Apps tab, search for the appliance and check the details.
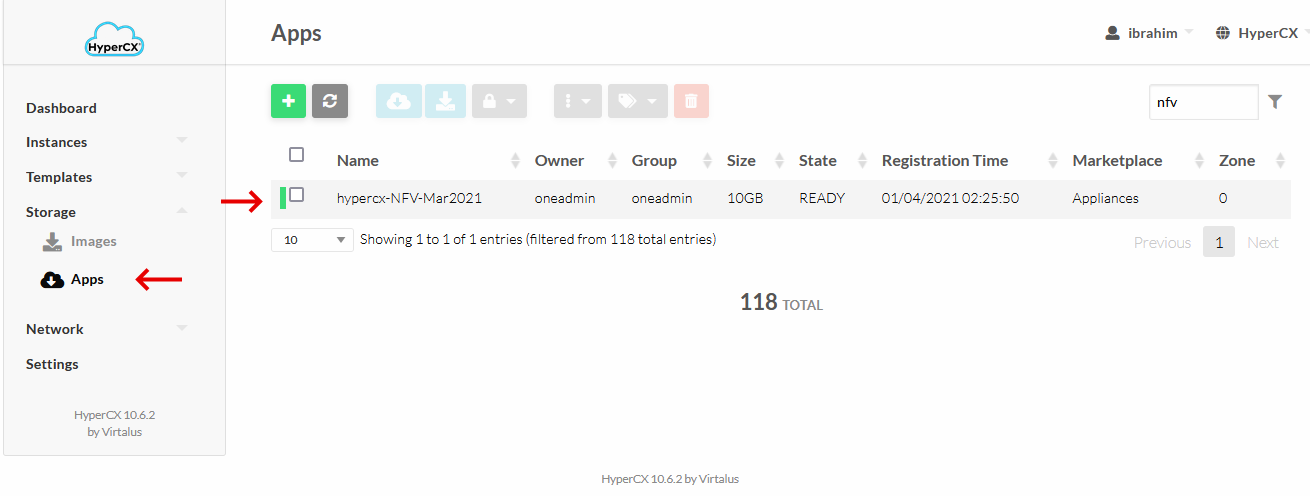

If the market's version is newer, you might want to upgrade your current version. In order to do this, simply download the new appliance from the market and destroy your old local appliance (template + images).
Note
Keep in mind that you will not be able to destroy a template if VMs are running from it.
Deploying an NFV appliance
Easy of use is one of the core principles around HyperCX NFV. An instance can be created in standalone mode (no support for HA) or in HA mode. The chosen deployment strategy should be based on how critical these services will be. Note that HyperCX public clouds and HyperCX Bento clusters use redundancy on all the major components, providing full HA infrastructures, but a server failure (which is an isolated event since every hardware component is proactively monitored) will bring a downtime of 6-8 minutes to all the instances that were running on that server. This is the time that will take the system to detect the failure, validate it is not a false positive and migrate all the instances.
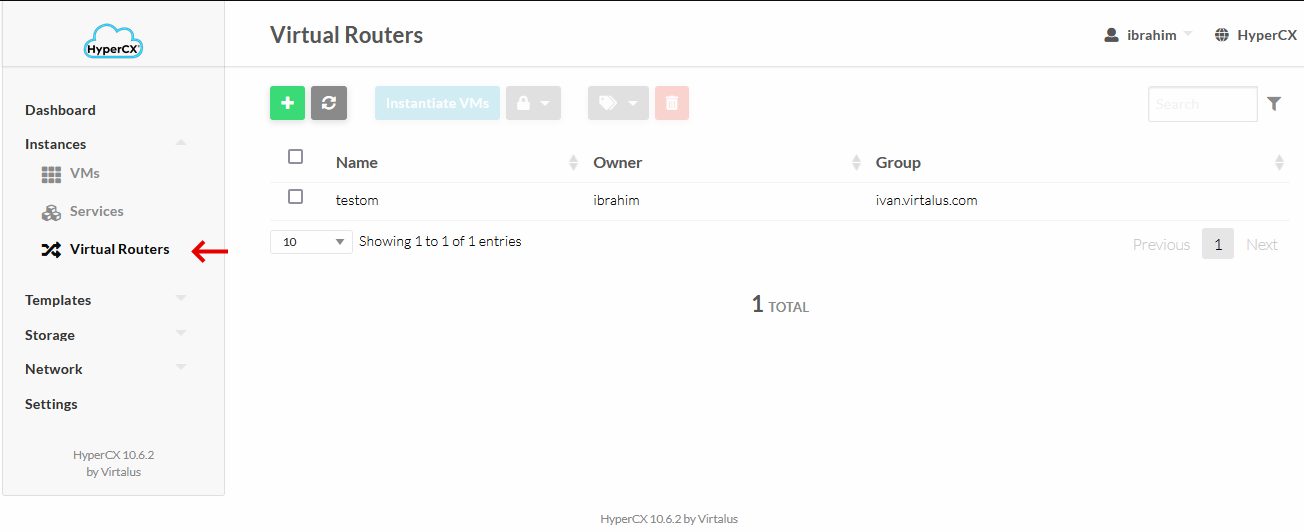
HyperCX NFV appliances are deployed and managed from Instances --> Virtual Routers.
-
Deploying in standalone mode
To deploy a single, non-HA, instance of HyperCX NFV create a new Virtual Router appliance.
Note
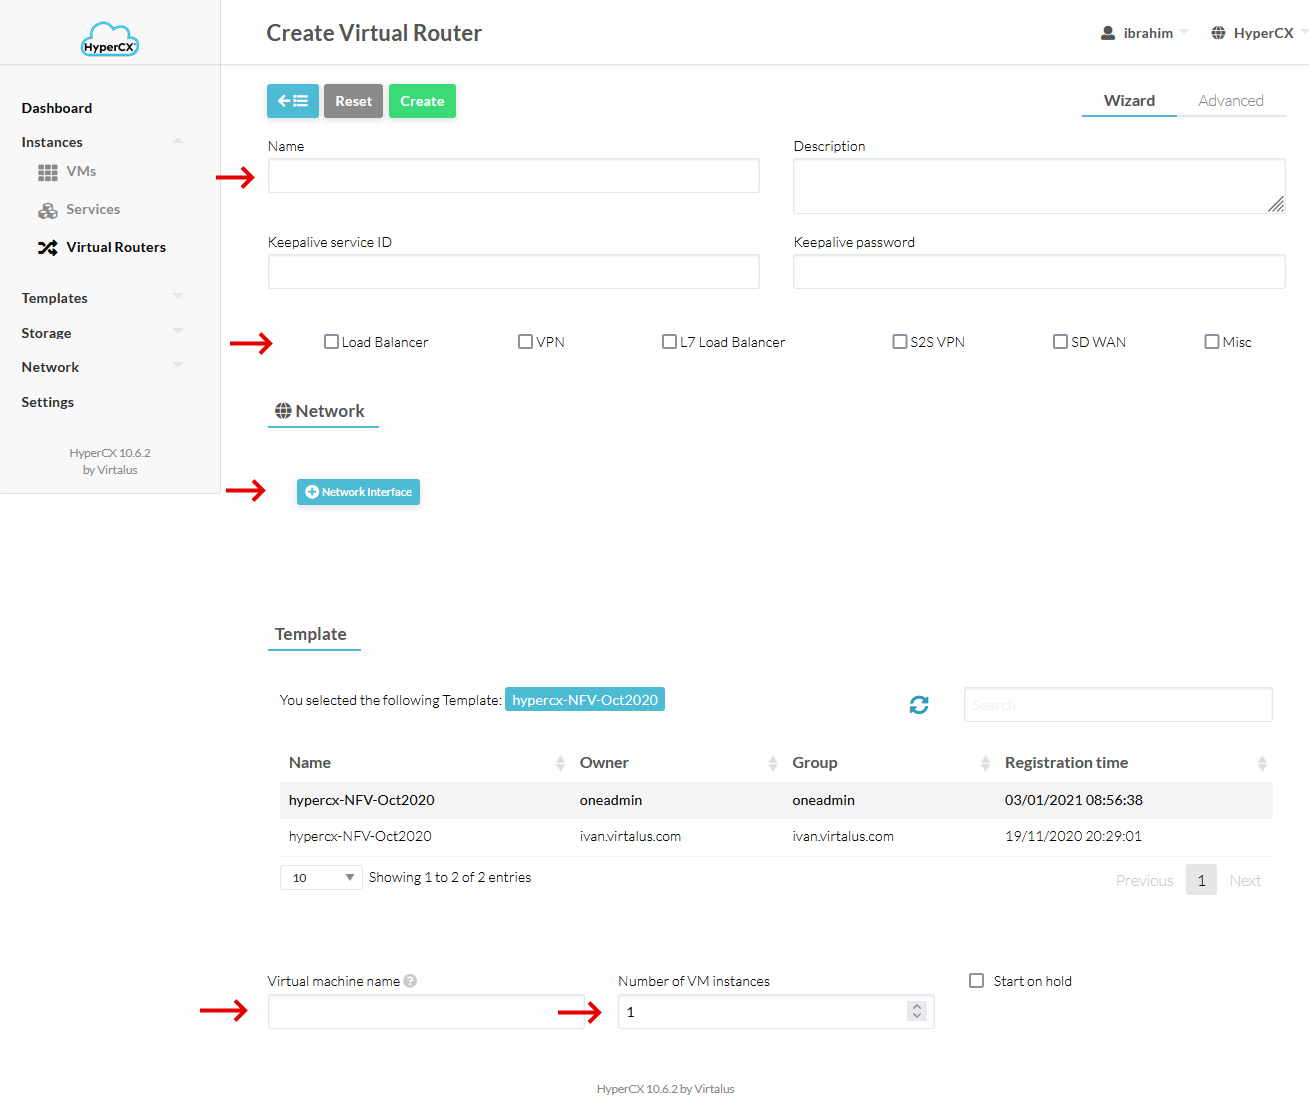
Leave in blank the Keepalive parameters since they only make sense for HA deployments.
Next, give your Virtual Router a name and select Network Functions that you want to use.
Add all the networks that will require service from HyperCX NFV. Note that these networks will be routed among them. This appliance, like every HyperCX virtual instance, will use the gateway from the first NIC (or VNET) defined. This is very important when configuring the network interfaces. For example, if you intend that the internal (private) networks are routed to the internet (most common case) the first Virtual Network should use a public virtual network defined with a public IP and a gateway.
Select your HyperCX NFV template, write a name for VM instance, set 1 under Number of VM instances and click on Create.
-
Deploying in HA mode
For HA deployment a few parameters can be leveraged, which made no sense on standalone instances:
- Keepalive service ID: Defines Keepalived virtual_router_id parameter. This parameter will be the same among all the VM instances of the appliance. If left blank, the vRouter ID will be used (recommended).
- Keepalive password: Defines a common password for all the instances to communicate via VRRP. If left blank, no password will be used and any other Keepalive instance will be able to join the cluster without authentication.
When selecting the networks, a floating IP will be needed on each NIC that will leverage HA. In order to do this, insert the IP under Force IPv4 (or v6) and click Floating IP. This setting will provide an IP obtained from HyperCX's IPAM to each instance, and the defined IP will also be used on the master keepalived instance. A floating IP can be used on each different virtual network, but depending on the use case, not all the virtual networks actually need a floating IP. This will be covered in more detail later on.
If Floating IP is not selected, several instances will be deployed with a single IP on the specific NIC, no floating IP will be configured on that NIC so Active-Passive HA will not be supported on the selected interface. If no IP is specified but Floating IP option is checked, the floating IP will be automatically assigned from HyperCX internal IPAM.
Under Number of VM instances, select 2 or more. No more than 2 instances are needed or recommended.
Getting information
After the virtual router is deployed, you can get information like the version number and all the enabled VNFs and their configuration by logging in to any VM instance. A message similar to this will appear:
 _   _                        ______  __  _   _ _______     __
| | | |_   _ _ __   ___ _ __ / ___\ \/ / | \ | |  ___\ \   / /
| |_| | | | | '_ \ / _ \ '__| |    \  /  |  \| | |_   \ \ / /
|  _  | |_| | |_) |  __/ |  | |___ /  \  | |\  |  _|   \ V /
|_| |_|\__, | .__/ \___|_|   \____/_/\_\ |_| \_|_|      \_/
       |___/|_|
VERSION: 1.0
=========================VRRP========================
Interface ETH0 using floating IP:
Interface ETH1 using floating IP: 10.10.0.180
Keepalived ENABLED
=========================MASQUERADE========================
IPV4 MASQUERADE ENABLED VIA ETH0
IPV6 MASQUERADE DISABLED
=========================LOAD_BALANCER========================
LOAD BALANCER ENABLED.
Load Balancer backend 1: 10.10.0.123
Load Balancer backend 2: 10.10.0.124
Load Balancer backend 3: 10.10.0.125
Load Balancer backend 4: 10.10.0.32
--------------------------------------------------
LOAD BALANCER AUTHENTICATION ENABLED
Load Balancer monitoring portal URL: http://server_address:8989/stats
Load Balancer monitoring portal user: admin
Load Balancer monitoring portal password: password
--------------------------------------------------
=========================OPENVPN========================
OpenVPN ENABLED.
Created OpenVPN account for user user1
Created OpenVPN account for user user2
Detected internal network: 10.10.0.21 255.255.0.0
Detected internal network: 192.168.80.0 255.255.255.0
Last login: Tue Feb  4 23:45:14 2020 from 189.203.29.206
In addition, it is possible to obtain information in the Info section within the vm of HyperCX NFV, under Attributes section.
Virtual Network Functions
Next, every VNF supported by HyperCX NFV will be explained.
Masquerade
This VNF provide Internet access to the internal Virtual Network. If the first Virtual Network defined on the virtual router uses a public IP, masquerade will be automatically enabled through this interface. No extra configuration is needed. HyperCX leverages iptables for the masquerade VNF.
Deployment considerations
Masquerade VNF will require that every VM uses the vRouter's IP as gateway. For HA deployments, a floating IP must be used on each internal network, but it is optional for the public network. The VMs inside the virtual networks will use the active vRouter's public IP as source IP for the masquerade.
L4 Load Balancing
HyperCX uses HAProxy to provide load balancing features. This is used to balance all kind of applications, except those that use https, since it is not supported to handle the certificate. If this VNF is used, HAProxy will be configured with the following considerations:
-
HAProxy will work in reverse-proxy mode, the backend servers see its IP address as their client address. This is easy to configure and manage since the backends will not need to configure the load balancer as gateway, and the client will not get a response from a different IP to which it made the request. This is sometimes annoying when the client's IP address is expected in server logs, so some monitoring features or sessions based on source IPs would be limited.
-
Multiple sites can be balanced through different frontend ports.
-
To overcome the previous limitation, the well-known HTTP header "X-Forwarded-For" is added to all requests sent to the server. This header contains a value representing the client's IP address. Since this header is always appended at the end of the existing header list, the server must be configured to always use the last occurrence of this header only. This is something easy to implement on the backend application.
-
Client requests will be maintained to a single server. This is useful for web applications that rely on sessions.
-
Backends are monitored via tcp-checks. This means that, as long as the port is open and listening for connections, the backend will be marked as healthy and will receive requests.
Deployment considerations
Load Balancing VNF does not require that the backend VMs use the vRouter's IP as gateway.
There are two main strategies regarding the virtual networks that will be used:
-
The vRouter will use at least two virtual networks. The frontend will listen into one while the backends are located on the second one. A good case scenario is to use a public IP on the first vNet and any IP on a private network where the backends are located. This will allow to publish a web app to the Internet without the need of an extra firewall performing NAT features.
-
The vrouter will use a single virtual network. On this configuration, the frontend listens on the same virtual network where the backends are located. This is easier to setup and a common scenario could be a frontend located on Network X that connects to a few API servers located on the same network via the load balancer.
For HA deployments, a floating IP must be used on the frontend network and requests must be directed to the floating IP only. Configuring a floating IP on the backend's network is not necessary.
Configuration
Three parameters are mandatory to enable the load balancing VNF. These three will be configured in a single field. During instantiation, under Custom attributes. If all three attributes are present in the field, the load balancer will be enabled.
-
LB BACKENDS: IPs of the backend servers separated by comma. Set the IP of every backend server you intend to use separated by a comma. Ex: 10.10.0.123,10.10.0.124,10.10.0.125
-
LB FRONTEND PORT: Set the port that will be used by the frontend.
-
LB BACKENDS PORT: Set the port that will be used by the backends.
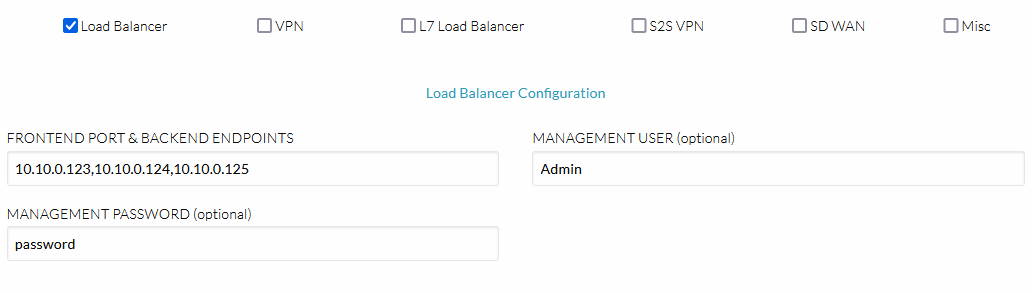
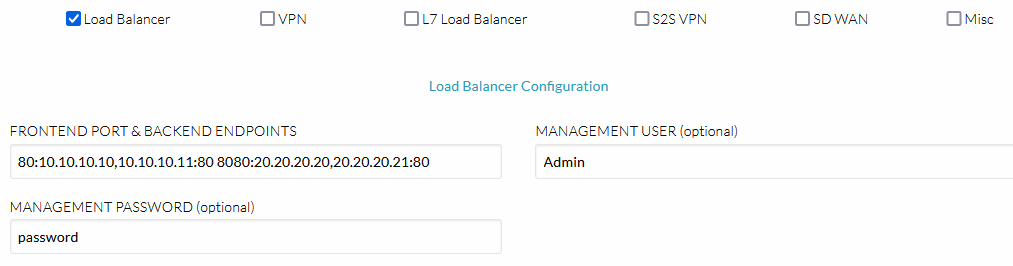
These parameters must be set in a field called LB_BACKENDS_PORTS as follows: LB_FRONTEND_PORT:LB_BACKEND1,LB_BACKEND2,...,LB_BACKENDN:LB_BACKENDS_PORT. Multiple sites can be configured in the previous way separated by spaces. Ex--> 80:10.10.10.10,10.10.10.11:80 8080:20.20.20.20,20.20.20.21:80.
Monitoring
HAProxy supports a monitoring web page that shows information of all the backends. This feature is disabled by default. In order to enable it, these two parameters must be filled:
-
LB USER: Username for the load balancer's management portal
-
LB PASSWORD: Password for the load balancer's management portal
After inserting the previous information, the management portal can be reached using the following URL:
http://$HyperCX_NFV_IP:8989/stats
VPN
HyperCX NFV provides VPNs based on OpenVPN. Some considerations on this VPN are as follows:
- CA certificate is the same on all HyperCX NFV appliances. User's authentication is only performed via password via a custom authentication plugin developed by Virtalus.
Deployment considerations
VPN VNF will require that every VM uses the vRouter's IP as gateway. For HA deployments, a floating IP must be used on the public network and each internal network. This floating IP is the one that must be defined on the .ovpn configuration file.
Configuration
In order to enable the VPN VNF, a public network with a public IP must be set up as the first Virtual Network (just like the masquerade VNF). Besides of this, a configuration parameter is mandatory:
-
VPN CREDENTIALS: User and password for each VPN user. This will configure all the users that will be able to use the VPN and their credentials. Each user will be configured with it's password separated by a colon in the format: "username:password". Several user/password pairs can be inserted separated by spaces.
Ex: user1:pass1 user2:pass2 user3:pass3
After the appliance is running, you can get the .ovpn configuration files under /root/vpn_config_files on any instance. Alternatively, you can copy the following configuration file:
dev tun
cipher AES-256-CBC
persist-key
persist-tun
status openvpn-status.log
verb 3
explicit-exit-notify 1
client
auth-user-pass
auth-nocache
remote $PUBLIC_IPV4_ADDRESS 1194 udp
<ca>
-----BEGIN CERTIFICATE-----
MIIDQjCCAiqgAwIBAgIUKHe8HaisIp9iK7BoWrF3PrWET7MwDQYJKoZIhvcNAQEL
BQAwEzERMA8GA1UEAwwIQ2hhbmdlTWUwHhcNMjAwMjAzMDUxNTI1WhcNMzAwMTMx
MDUxNTI1WjATMREwDwYDVQQDDAhDaGFuZ2VNZTCCASIwDQYJKoZIhvcNAQEBBQAD
ggEPADCCAQoCggEBANZWy4vULsjfqsbUuj+S7oJ51EO1rhBC18cIa4ehgJegUGH7
Sz3BOE9uDVBy585pIwdta3KAkxV6rgdxEo23CfoUn+ibHoZtri3FUZJ+Rur5vyNF
jGj1AI8GDbAW7K11rhSvfLneNY+Ia/6/uJG+Wa28zmM1scC9u37PrWpFOXIfxCdY
tGe9sfkVx4yRbKNsNAZb14D6HEHqoK0F0dMqFnJeh6cERI6X77eq2QwPKqXzmqPg
PClkdohJnQ7Gg5Ac4LDUx8Zk/QUXWT/yPXC1NgAqVMGBiiXhG5nfgvef2W+WX7og
iFeU+RKXS1eJBru72mzEl2u5UJZP1VsAzsVmiykCAwEAAaOBjTCBijAdBgNVHQ4E
FgQUlq6eCqIWaGAEIrmbv+orFDm5hKMwTgYDVR0jBEcwRYAUlq6eCqIWaGAEIrmb
v+orFDm5hKOhF6QVMBMxETAPBgNVBAMMCENoYW5nZU1lghQod7wdqKwin2IrsGha
sXc+tYRPszAMBgNVHRMEBTADAQH/MAsGA1UdDwQEAwIBBjANBgkqhkiG9w0BAQsF
AAOCAQEAUQI/iQcCCHSkiQD9qUGozgsoHXMPPkm5xeDnjVXny+Ei3lCgrUJC/oqG
xPgja3WTODuOzUhFphRZQKqVxRgjVWRf8dOTJx3+KLVseYumFQ11yaZ/MBoTicMz
sjk9p8DqIrfU8x9cy720x7NQCaHvQlAushxnefXuzlkqWyeXmBJnPOM9hcxJc5/G
kPruTlKWmSBBg7qYEsy6CifBsVbN+6gZHwsgmkhyxQ/j7/h8t2gva4d11XWXtVWj
LyA0HCZw6iQSIowFnwWPFv+WckV4WWdC/ERlR95nBsPWCHzOsKtnkpEJjOHiBWh1
LzKPHae4zKnB4sNyRj/hEa5Xa/nNwg==
-----END CERTIFICATE-----
</ca>
Note
Modify the public IPv4 address.
Hardening security
There are two basic options to harden the VPN security. In both cases, this requires that the user generates it's own PKI and copies some files to every vRouter instance.
Generating a PKI
This is a simple example to build a PKI. This does not need to be executed on any virtual router instance (although it is an option). The goal is to generate the required files and save them.
Download and decompress easy-rsa from this link.
Generate pki:
./easyrsa --pki-dir=/etc/openvpn/pki --batch init-pki
./easyrsa --pki-dir=/etc/openvpn/pki --batch build-ca nopass
./easyrsa --pki-dir=/etc/openvpn/pki --batch gen-req HyperCX nopass
./easyrsa --pki-dir=/etc/openvpn/pki --batch sign-req server HyperCX
openssl dhparam -out /etc/openvpn/dh2048.pem 2048
openvpn --genkey --secret /etc/openvpn/ta.key
Custom CA certificate
The easiest option would be to replace the CA certificate while keep relying on the user/password authentication. This will maintain all the server configurations and only the new CA certificate is required. Replace the server's /etc/openvpn/pki/ca.crt with the newly generated certificate. Client's configuration will also need to modify the included certificate.
Custom PKI and certificate based authentication
This is the recommended option, and requires the entire pki to be replaced. Also, the client's keys will need to be generated:
./easyrsa --pki-dir=/etc/openvpn/pki --batch gen-req client nopass
./easyrsa --pki-dir=/etc/openvpn/pki --batch sign-req client client
A new OpenVPN server and client configuration file are also required.
S2S VPN
HyperCX NFV provides StrongSwan based Site-to-Site (S2S) VPNs. This VPN comes preconfigured and only needs a few parameters to be configured.
Deployment Considerations
- All the preconfigured parameters on the appliances must be the same as in the remote site for the VPN to work.
- For the VPN to be available, three parameters are required: Remote Site Public IP, Remote Site Networks, Pre-shared Key
- Each VM will be required to use the vRouter's IP as gateway.
- For HA deployments, a floating IP must be used on the public network and on each internal network.
Pre-configured Parameters
Since HyperCX NFV is based on its simplicity, there are some VPN parameters that are preconfigured as follows:
Phase1:
- Key Exchange version: Auto
- Authentication method: Mutual PSK
- Encryption algorithm: aes256
- Hash: sha256
- DH Group: 2(1024)
- Lifetime (Seconds): 28800
Phase2:
- Protocol: ESP
- Encryption algorithm: aes256
- Hash Algorithm: sha256
- PFS key group: 2(1024)
- Lifetime: 3600
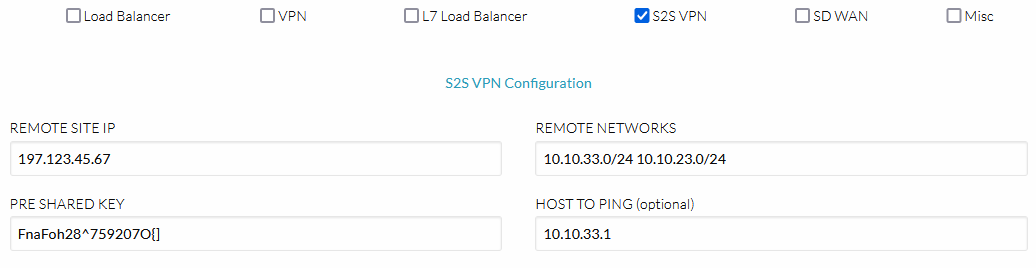
Configuration
To enable S2S VPN, a public network with a public IP must be configured as the first Virtual Network (just like the OpenVPN VNF). In addition, three parameters are mandatory:
- S2S REMOTE SITE IP: Public IP of the remote site for the S2S VPN. This will be used as the edge point at the remote site.
- S2S REMOTE NETWORKS: Remote Networks shared by the S2S VPN. These are the networks from the remote site that will be able to access the local private networks and vice versa. Multiple networks separated by spaces can be inserted. Ex: 10.10.10.0/24 10.10.20.0/24
- S2S PRE SHARED KEY: Pre-shared key used by the S2S VPN. PSK is used as authentication method. This will be used to authenticate the VPN on each side. Must be the same on both sites.
There is another (optional) parameter that could be configured to monitor the status of the VPN, the S2S HOST TO PING. This option is for the Local Site to monitor the other edge, it must be a host at the Remote Site with the ping allowed.
L7 Load Balancer
HyperCX NFV provides Layer 7 balancing capabilities based on NGINX. This is used to balance websites behind an https certificate. Here, NGINX will be configured with the following considerations:
-
NGINX will work as reverse proxy, the backend servers see its IP as their client address. This is easy to configure and manage since the backends will not need to configure the load balancer as gateway, and the client will not get a response from a different IP to which it made the request. It is very similar to the other Load Balancer that HyperCX NFV provide.
-
Multiple sites can be configured using URLs as identifier.
-
Client requests will be maintained to a single server.
-
The SSL certificate will be maintained to a single server, the HyperCX NFV appliance. This avoids to keep the certificate in all the backends.
-
Backends are monitored. This means that, as long as the backends is listening for connections, it will be marked as healthy and will receive requests.
Deployment Considerations
L7 Load Balancer does not require that the backends use the vRouter's IP as gateway. The considerations here are similar to the previously mentioned L4 Load Balancing VNF.
Note
These VNF will automatically configure an SSL certificate for the HTTPS endpoint based on letsencrypt. For this to work, a DNS entry must be configured on your DNS servers pointing Site URL to the public IP these vrouter will have. You can force a specific IP from the address pool on the NIC options.
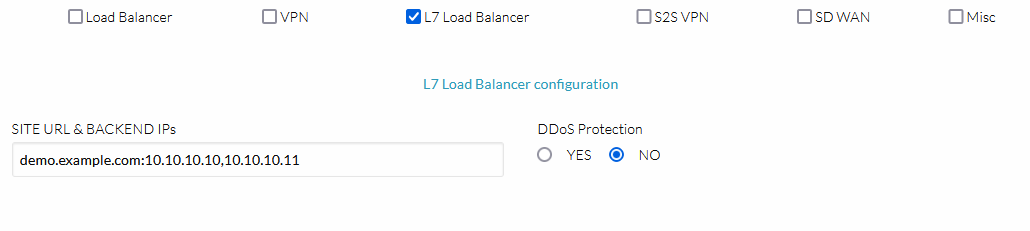
Configuration
Only two parameters are mandatory to enable the load balancer. These two must be set in a single field. During instantiation, under Custom attributes. If both attributes are found in the field, the load balancer will be enabled.
-
L7_URL: URL of the site to be balanced.
-
L7_BACKENDS: Backends of the site separted by comma.
-
L7_BACKENDS_PORT (optional): Optionally, the port of the backends can be specified.
These parameters must be set in a field called L7_SITES_BACKENDS as follows: L7_URL:L7_BACKEND1,L7_BACKEND2,...,L7_BACKENDN:L7_BACKENDS_PORT. Multiple sites can be configured in the previous way separated by spaces. Ex--> demo.example.com:10.10.10.10,10.10.10.11 text.example.com:20.20.20.20,20.20.20.21:9443.
Note
All http requests will be automatically redirected to https.
Warning
L7 Load Balancer will only work with valid URLs as the feature supports multiple sites and they must be differentiated by the URL.
Warning
L7 Load Balancer is not compatible with HyperCX NFV HA. Works only with standalone deployments.
Security
A Distributed Denial of Service (DDoS) attack is an attempt to make a service, usually a website, unavailable by bombarding it with so much traffic from multiple machines that the server providing the service is no longer able to function correctly because of resource exhaustion.
Since HyperCX 10.6.1 and HyperCX NFV 2.1.14, Virtalus offers the ability to drasatically reduce the effects of these attacks in the L7 Load Balancer feature. This is possible by applying a series of recommendations specific to nginx, since the feature is based in NGINX.
Recommendations:
-
Close slow connections. The time Nginx is waiting between the writes of the client body and between the writes of client header, both are set to 5 seconds
-
Limit the connections to backend servers. The specific number of connections Nginx can open up for each server is set to 100.
-
Optimize worker connections. This allows each of the worker process to handle up to 50000 connections.
-
Optimize buffer sizes. We limit some buffer sizes to mitigate the DDoS attacks, such as client_body_buffer_size to 200K, client_header_buffer_size to 2k, client_max_body_size to 200k and large_client_header_buffers 3 to 1k.
To enable this feature, you only need to enable DDoS protection within the HyperCX portal.
SD-WAN
Overview
There have been significant changes in wide-area networks over the past few years, few more important than software-defined WAN or SD-WAN, which is changing how network engineers think about optimizing the use of connectivity that is as varied as Multiprotocol Label Switching (MPLS), frame relay and even DSL.
As the name states, software-defined wide-area networks use software to control the connectivity, management and services between data centers and remote branches or cloud instances. Like its bigger technology brother, software-defined networking, SD-WAN decouples the control plane from the data plane. It is a virtual WAN architecture that allows enterprises to leverage any combination of transport services – including MPLS, LTE and broadband internet services – to securely connect users to applications.
An SD-WAN uses a centralized control function to securely and intelligently direct traffic across the WAN. This increases application performance and delivers a high quality user experience, resulting in increased business productivity, agility and reduced costs for IT.
The key benefits include:
-
Increased bandwidth at a lower cost since the network traffic is optimized
-
Centralized management across branch networks through a simple management console, which reduces the need for manual configuration and on-site IT staff
-
Full visibility into the network, as the controller gives operators a holistic view of the network.
-
More options for connection type, since the network can use both private and public connections to route its traffic.
HyperCX + ZeroTier

HyperCX NFV integrates with Zerotier, a distributed network hypervisor built atop a cryptographically secure global peer to peer network. It provides advanced network virtualization and management capabilities on par with an enterprise SDN switch, but across both local and wide area networks and connecting almost any kind of app or device. It uses the easiest to manage and most widely supported network virtualization platform to connect all your devices, cloud VMs, and apps as if the whole world is one big cloud region.
ZeroTier virtual networks are like chat rooms for machines. Just create virtual networks, join them from your devices and systems, approve authorization for the things you’ve added, and you’re done! Advanced features like network rules engine help you manage your networks like a pro, and automatic end-to-end encryption keeps everything private and secure.
Requisites
HyperCX NFV virtual routers must meet the following requirements:
-
It must have at least two interfaces, the main one with internet access and the second with the network that you want to route through SD-WAN.
-
The secondary must be the network gateway of the network that you are going to route.
How to use
Zerotier is a first-class citizen in HyperCX NFV virtual routers. You just need to follow the steps below:
-
Create an account in zerotier.
-
Create a Network within the Network Section inside your session.
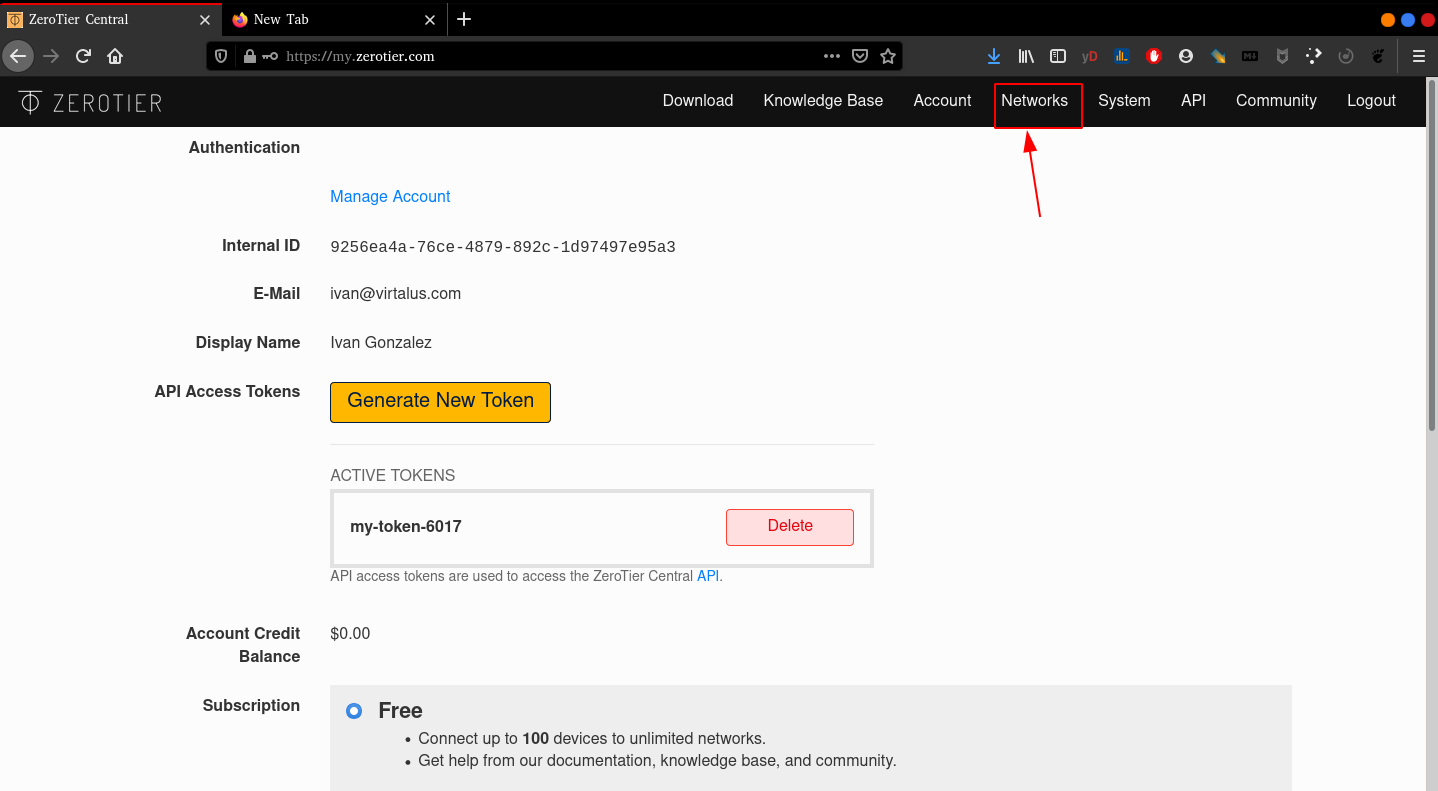
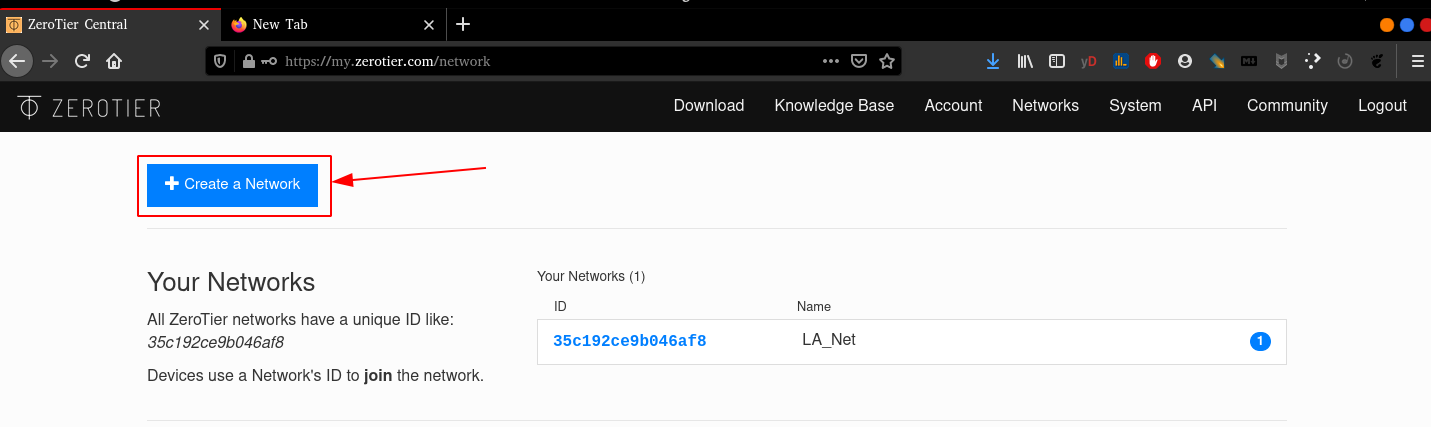
-
Select a network range.
-
Copy the network-id.
-
Deploy a HyperCX NFV and paste the Network-id into the NFV options.
Note
The HyperCX NFV appliance will create the network interface automatically and wait for the next step.
- Accept the device request within the Zerotier portal.
Note
With this, an ip will be automatically assigned to the device or VM.
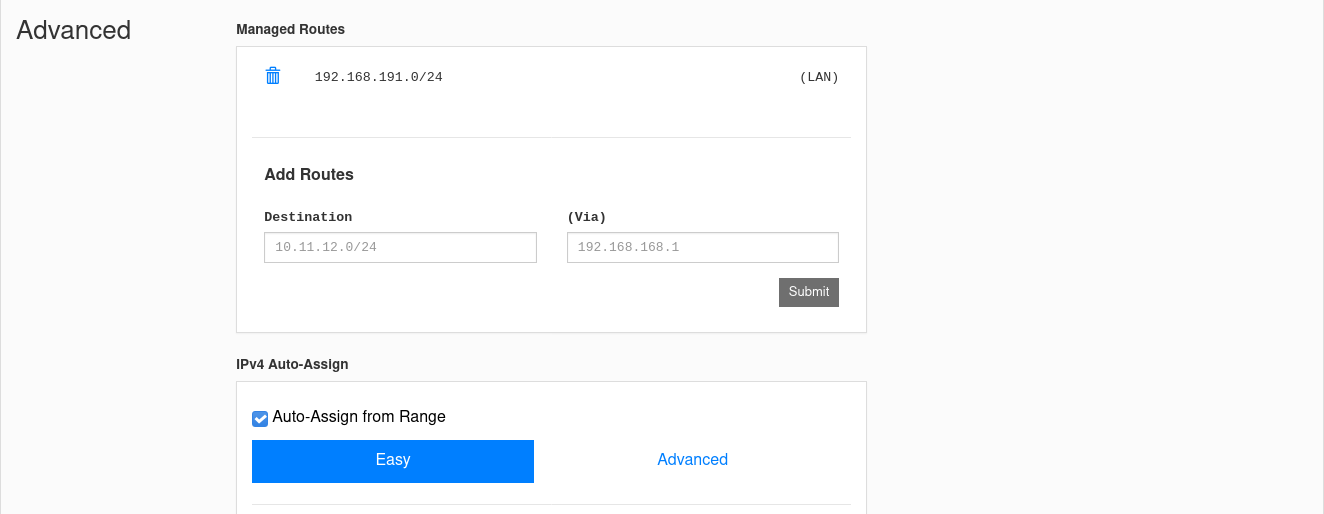
- Add routes to access your private network on the Zerotier portal.
Example:
A company has some servers on the 192.168.0.0/24 network, which is on a HyperCX infrastructure, and HyperCX NFV is the default gateway (192.168.0.1). HyperCX NFV has been added to the Zerotier network following the steps previously explained, so it took an IP from that network (192.168.191.100). In addition, there is a network for the company office connected to a router that is also attached to the Zerotier network (192.168.191.147)
If you want the machines connected to the office network to reach the servers, you must add a route in the Zerotier portal indicating that the server network (192.168.0.0/24) must be reached through 192.168.191.100 (the ip HyperCX NFV on the Zerotier Network). This will ensure that office workers can access company servers.
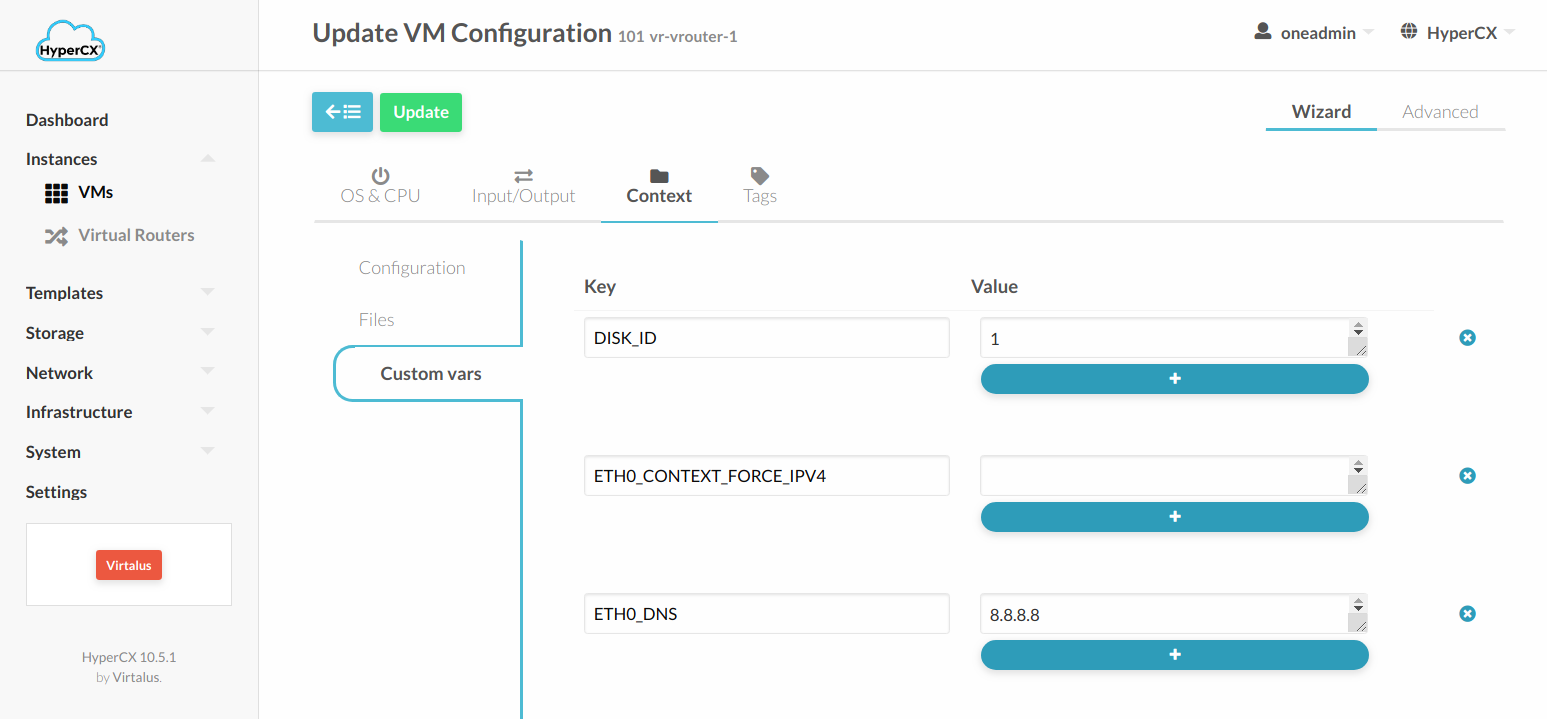
Modify configurations
After the virtual router based on the HyperCX NFV template is deployed, any configuration from any previous VNF must be configured directly on the VM instances. First, you need to identify all the VM instances that belong to the virtual router instance. This can be seen by selecting the virtual router and, inside the virtual router instance, clicking on the VMs tab.

To change the config in each VM it is necessary to go into the Conf tab from the VM and click Update Configurations. The required configurations can be found under Context --> Custom vars.