Virtual Network Management
Overview
A virtual machine is connected to one or more networks that are available to the virtual machines through the corresponding bridges. HyperCX allows the creation of Virtual Networks by mapping them on top of the physical ones. This chapter contains documentation on how to create and manage Virtual Networks.
HyperCX uses at least 3 different networks,
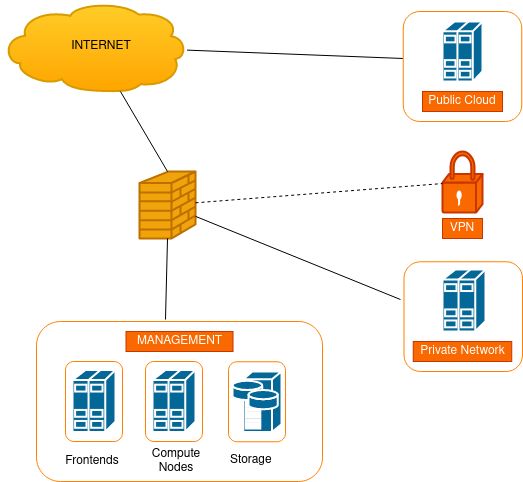
- Management Network. This network will interconnect HyperCX’s services and resources. It is not meant to be accessible by workloads so it is not configured on the orchestrator.
- Client Network. All the VMs created by users use Client Network and this Network will give Private IP for VM. All network traffic from this Network is behind a firewall. One or several client networks can exist. This is used as a Virtual Network.
- Public Network. This Network contains public IPs. It is accessed by the firewall and optionally, by workloads, giving the user the option to directly assign public IPs to VMs/containers. Might be used as a Virtual Network.
For Virtalus Public Clouds, there is no reason to worry about the underlying infrastructure. Also, Management and Client Network do not exist from the user's perspective. In case of Private Clouds, these networks are available to the administrator of the platform. The rest of this overview will be focused to briefly describe the underlying network infrastructure and Client Network, but keep in mind that this is only useful for administrators managing a Virtalus Private Cloud.
Physical Firewall and Infrastructure Virtual Router
HyperCX networks require a router and firewall to provide connectivity services and enhanced security only to Management and Client Network. For off-prem deployments, infrastructure virtual routers are the only option, but for on-prem deployments, users can skip the included virtual router for the infrastructure and use an existing firewall. There are pros and cons for each approach and this decision can not be reverted later on, so it is important to consider it.
HyperCX infrastructure virtual routers
Infrastructure virtual routers are a special service providing connectivity to the management network and client network. These virtual routers are not designed to be flexible, instead, they are designed to be as robust and secure as possible. Users can not configure or modify these virtual routers, instead they need to request support to Virtalus for some tasks like deploying a S2S VPN. Any bad configuration can leave users and Virtalus support locked out. This and security are the reasons why users can not interact directly with these virtual routers.
Warning
Infrastructure virtual routers are not to be mistaken with HyperCX NFV.
Features
Infrastructure virtual routers leverage the following features:
- HA for Bento clusters
- OpenVPN based client VPNs with unlimited clients
- IPSEC based S2S VPNs
- Automatic renewal of SSL certificates for orchestrator web portal
- Enhanced security policies
- Masquerading services for Client Network
Client Network
HyperCX Bento private clusters are preconfigured with a special network called Client Network. When the cluster leverages infrastructure virtual routers, this network presents several unique aspects that need to be taken into consideration when using it. Also, these aspects make it different to any other virtual network deployed by creating a new VNET or instantiating a VNET template.
Client Network is designed to be a virtual network available by default allowing users to quickly deploy their first instances. For some cases, this might be enough, but in others, more complex network topologies might be required and other virtual networks are to be created. Client Network is routed through the infrastructure virtual router. This network can reach Internet but no DNAT is available, so services in this network can only be published to the Internet by using a Load Balancer through HyperCX NFV (since these load balancers do not require to be the gateway). This network can not communicate by default with any other virtual network created in the cluster. Also, Client Network features can not be modified by replacing the existing infrastructure virtual router with another firewall or router.
Physical and Logical design
This section illustrates how physical components are interconnected in private clouds. For off-prem deployments, it is unlikely this design will vary, but not so uncommon for on-prem deployments, since users have more flexibility and can use their existing network infrastructures. For the logical design, this will be the basic topology obtained "out of the box". By using virtual networks and HyperCX NFV, users can create bigger and more complex topologies.
Physical design
Network physical design will vary depending if infrastructure virtual routers or physical firewalls are used.
Physical Firewall scheme
Components are interconnected as described on the following diagram: 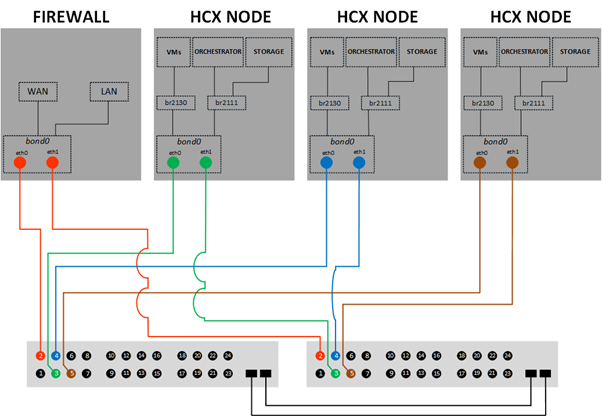
Note
Bridge names can change.
Virtual Firewall scheme
Components are interconnected as described on the following diagram: 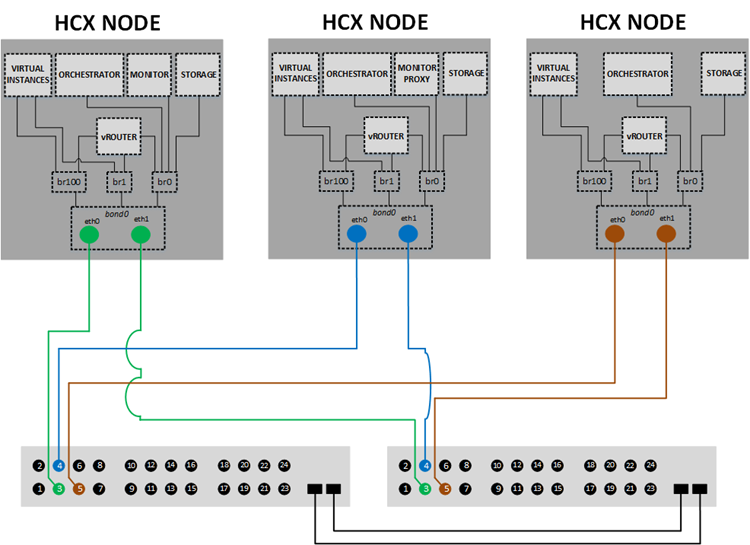
Note
Bridge names can change.
Logical Design
Virtual Networks
Virtual instances use virtual networks for connectivity. These can be manually created from scratch or by instantiating a VNET Template. Most HyperCX clusters provide a pre-configured VNET Template called Private IPv4. If possible, it is recommended to use that template since it will abstract most of the complexity of the underlying network, and in certain environments like off-premise deployments might be the only option. Creating Virtual Networks from scratch is primarily meant for on-premise deployments where users have full control of the underlying physical network.
Virtual Network Definition
A Virtual Network consists of three different parts:
-
The underlying physical network infrastructure that will support it, including the network driver.
-
One or more address ranges. Addresses associated to a Virtual Network can be IPv4, IPv6, dual stack IPv4-IPv6 or Ethernet (MAC only).
-
The guest configuration attributes to setup the Virtual Machine network, that may include for example network masks, DNS servers or gateways.
Physical Network Attributes
To define a Virtual Network include:
NAMEto refer this Virtual Network.VN_MADthe driver to implement this Virtual Network. Depending on the driver you may need to set additional attributes. Different HyperCX clusters can use different drivers. For small to medium size private clusters VLAN (802.1Q) will most likely be used for its increased performance. If the cluster is hosted on-prem, users can add their network and do any required configurations on the network infrastructure. When cluster is hosted off-prem, this might require assistance from Virtalus. Supported drivers are:- Bridged network (hardly used).
- 802.1Q network
- QoS parameters (optional) for each NIC attached to the network, to limit the inbound/outbound average and peak bandwidths as well as the burst data size that can be transmitted at peak speed.
Address Space
HyperCX incorporates an IPAM that will handle IP addresses to workloads. The addresses available in a Virtual Network are defined by one or more Address Ranges (AR). Each AR defines a continuous address range and optionally, configuration attributes that will override the first level attributes defined in the Virtual Network. There are four types of ARs:
- IPv4, to define a contiguous IPv4 address set (classless).
- IPv6, to define global and ULA IPv6 networks.
- IPv6 no-SLAAC, to define fixed 128 bits IPv6 address.
- Dual stack, each NIC in the network will get both a IPv4 and a IPv6 address (SLAAC or no-SLAAC).
- Ethernet, just MAC addresses are generated for the VMs. You should use this AR when an external service is providing the IP addresses, such a DHCP server.
Guest Configuration Attributes
To setup the guest network, the Virtual Network may include additional information to be injected into the VM at boot time. These contextualization attributes may include for example network masks, DNS servers or gateways. For example, to define a gateway and DNS server for the virtual machines.
These attributes are automatically added to the VM and processed by the contextualization.
Virtual Network Types
Bridged Network
In this type, the virtual machine traffic is directly bridged through the Linux bridge in the nodes. Bridged networks can operate in three different modes depending on the additional traffic filtering made by HyperCX:
- Bridged, no filtering is made, managed bridge
- Bridged with Security Groups, iptables rules are installed to implement security groups rules.
- Bridged with ebtables VLAN, same as above plus additional ebtables rules to isolate (L2) each Virtual Network.
Considerations & Limitations
The following needs to be considered regarding traffic isolation:
- In the Bridged and Bridged with Security Groups modes you can add tagged network interfaces to achieve network isolation. This is the recommended deployment strategy in production environments in this mode.
- The Bridged with ebtables VLAN mode is targeted to small environments without proper hardware support to implement VLANS. Note that it is limited to /24 networks and that IP addresses cannot overlap between Virtual Networks. This mode is only recommended for testing purposes.
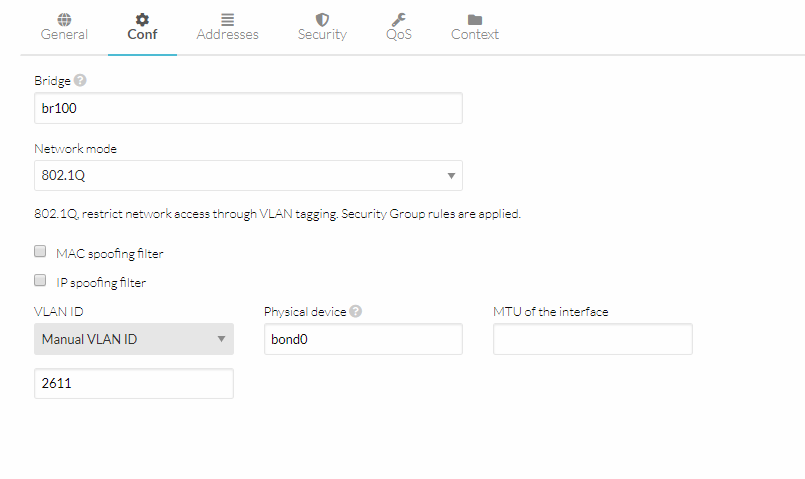
802.1Q Network
This driver will create a bridge for each HyperCX Virtual Network and attach a VLAN tagged network interface to the bridge. This mechanism is compliant with IEEE 802.1Q
The VLAN id will be the same for every interfaces in a given network. It is configured at the time of creation of the Virtual Network by configuring VLAN_ID in Manual and entering the the vlan number.
Add/Modify Virtual Networks
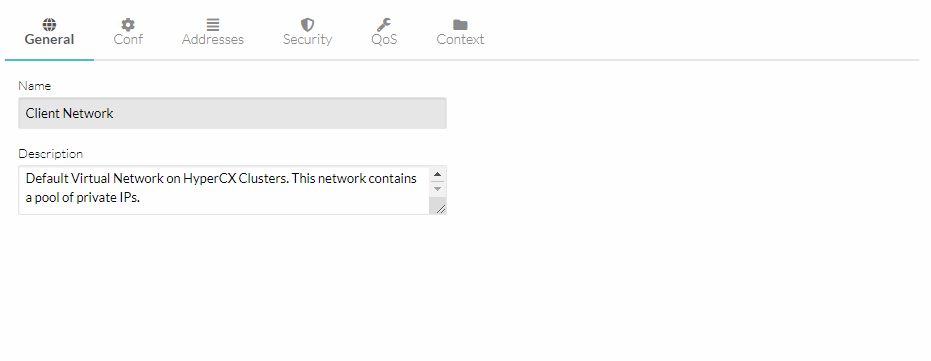
General
On the tab administrator can setup
-
Name of the virtual network
-
Select the cluster it’s meant for (if nothing specific is defined it’ll use “0:default”)
-
High level description for the end user and administrators.
Conf
Network related capabilities are set using this tab,
-
Bridge name is defined here. It should be left empty for HyperCX to automatically generate the name and avoid conflicts.
-
Network mode is defined.
-
IP and MAC spoofing is a security option to avoid ip or mac changes within VMs.
-
Manual VLAN ID and hardware ids are defined.
Note
Off-prem clients must contact Virtalus support team before create a Virtual Network from cero or instantiate the available Virtual Network Template. Because the latter must prepare conditions in the physical devices.
-
Address range
Here Administrators can add one or more address ranges, which are structured in Address Ranges (AR). Address Ranges can be dynamically added or removed from a Virtual Network. In this way, you can easily add new addresses to an existing Virtual Network if the current addresses are exhausted,with the following options:
-
First IPV4 address defines the starting point and then size defines how many IP addresses are reserved for this virtual network (for example 192.168.10.2/24 can be specified here as “Starting IP address:192.168.10.2” and “Size:254”)
-
Starting MAC address is also defined for the NIC. You can leave it empty and the system will automatically assign one.
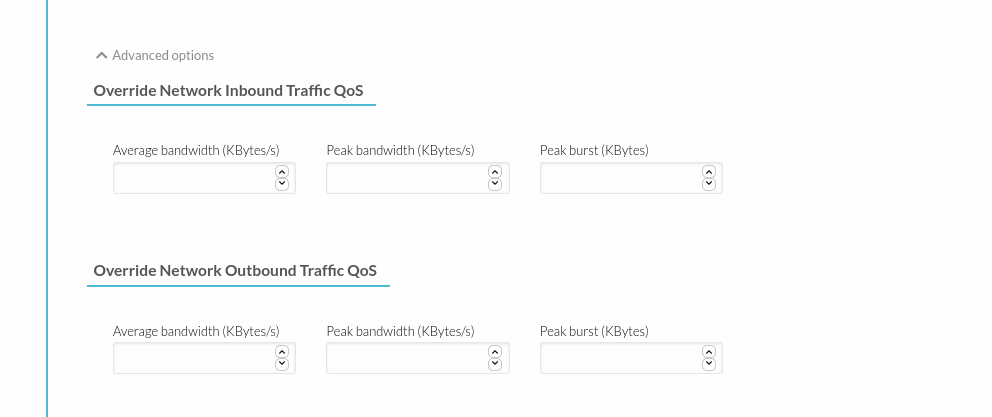
QOS
This tab enables HyperCX administrators limit a virtual network so every VM connected to this Virtual network will be individually capped and for both inbound and outbound traffic, by default HyperCX does not cap any bandwidth for any virtual network.Following are some of the features that HyperCX provides for capping bandwidth,
-
Average Bandwidth
-
Peak Bandwidth
-
Burst Bandwidth
Context
Context plays a vital role in defining the VMs so if a NIC is attached to a VM user shouldn’t worry about the initial configurations as HyperCX will take care of it, context variables define the initial configurations if this Virtual network is attached
-
Network address
-
Network mask
-
Gateway
-
IPv6 Gateway
-
DNS
-
MTU of the Guest interfaces
-
Custom attributes lets the administrator define if some custom context variables that might be needed if this virtual network is attached to a VM.

Updating a Virtual Network
After creating a Virtual Network, you can update the following attributes:
- Any attribute corresponding to the context or description
- Physical network configuration attributes, e.g.
VLAN_ID. - Any custom tag.
Note
On-prem Administrator can modify the network as they can manage the physical devices. But, Off-prem Administrator should not, as they don't know all the infrastructure specs.
Managing address ranges
Addresses are structured in Address Ranges (AR). Address Ranges can be dynamically added or removed from a Virtual Network. In this way, you can easily add new addresses to an existing Virtual Network if the current addresses are exhausted.
Adding, removing or modifying an address ranges:
-
Click Network > Virtual Networks.
-
Select the Virtual Network.
-
Go to Addresses section > Address Range.
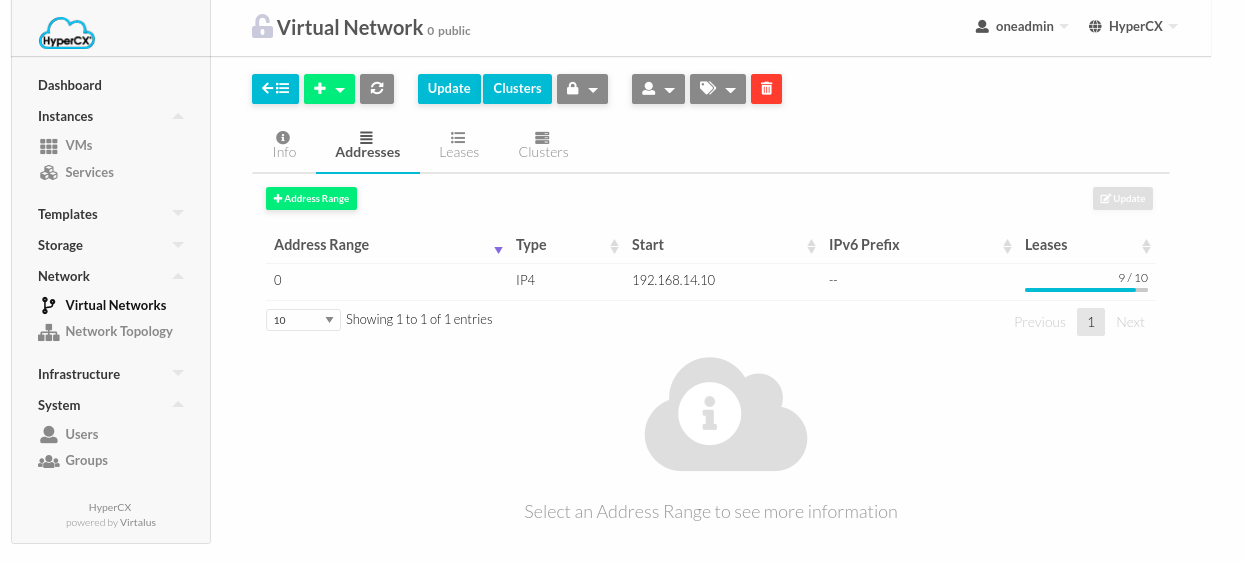
Add or remove Address Range. 
Modify Address Range size. 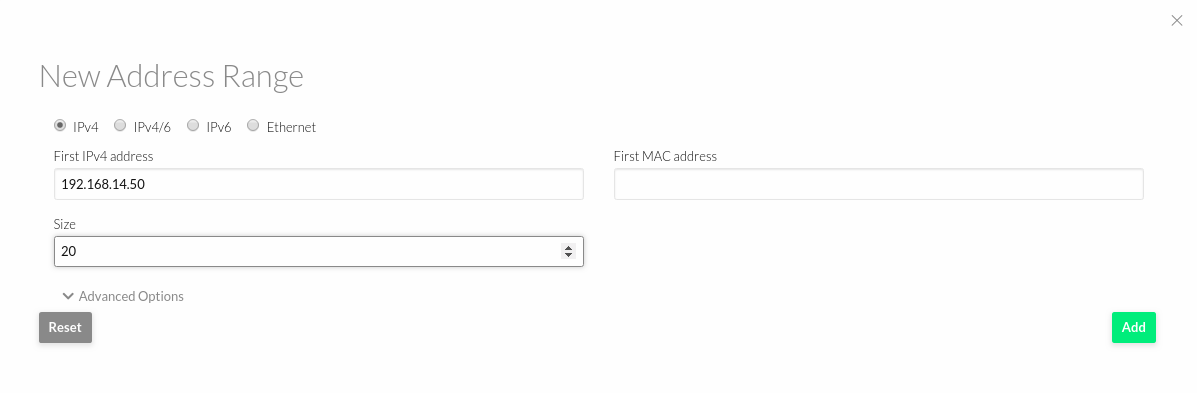
Hold and Release Leases
Address can be temporarily be marked as hold. They are still part of the network, but they will not be assigned to any virtual machine.
To do so, go to Leases within the desired virtual network, enter the ip and press the Hold IP button.
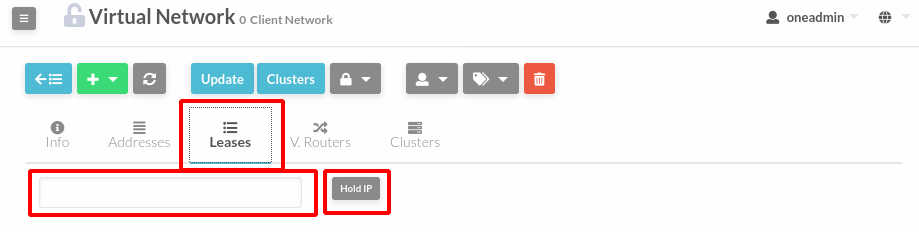
You will see the the hold ips in Leases as follows:

Using a Virtual Network
Once the Virtual Networks are setup, they can be made available to users based on access rights and ownership. By default, all Virtual Networks are automatically available to the group users.
Virtual Network can be used by VMs in Manual way: NICs in the VMs are attached to a specific Virtual Network.
Attach a Virtual Network to a Virtual Machine
To attach a Virtual Machine to a Virtual Network simply we can do this from the web interface:
-
Go to Portal and Login as SuperAdmin or Admin group.
-
Click Instances > VMs.
-
Select the VM that will attach a Virtual Network.
-
The network card can be attached with the VM in running state.
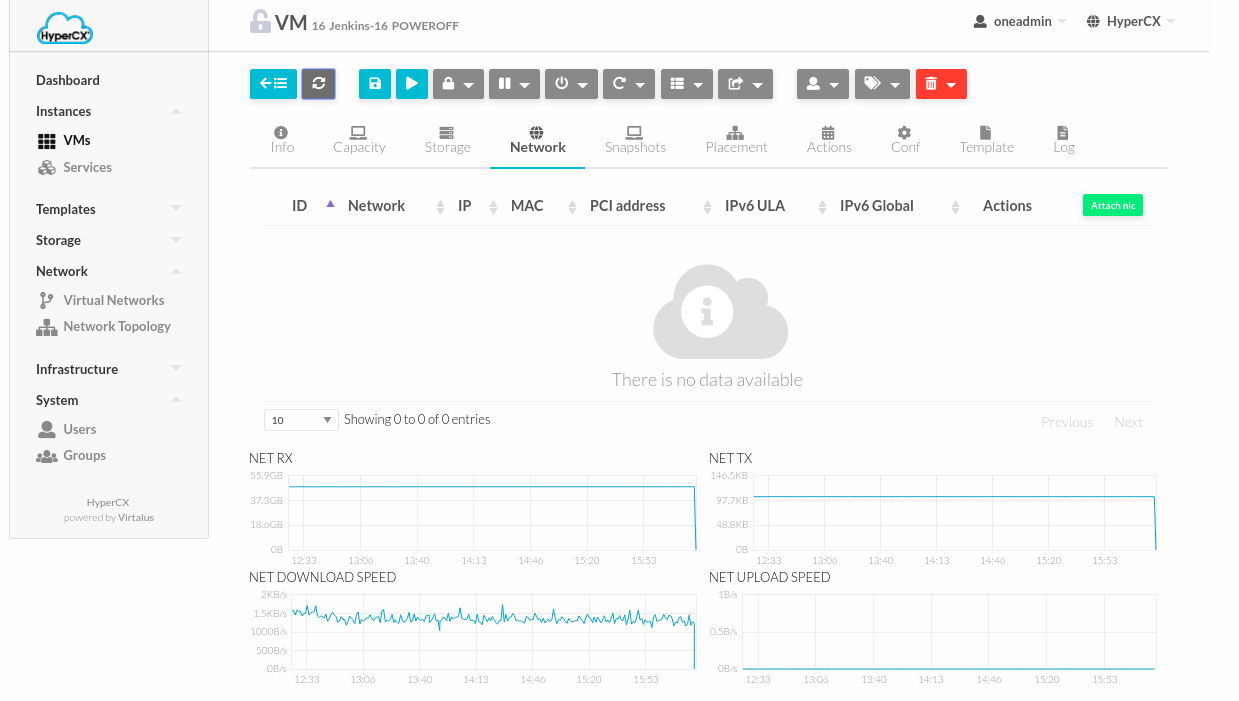
-
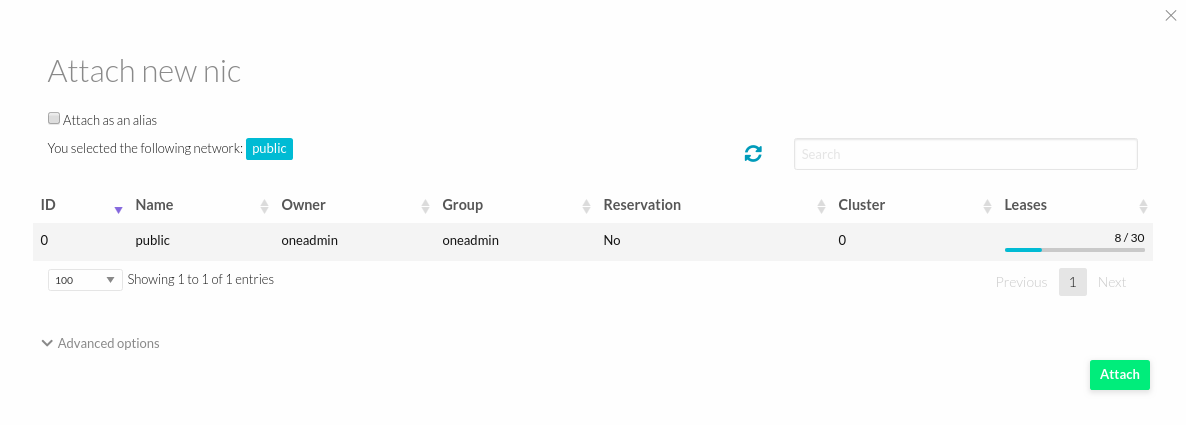
Go to Network Section > Click Attach NIC.
-
Select the NIC. Then Power ON the VM.
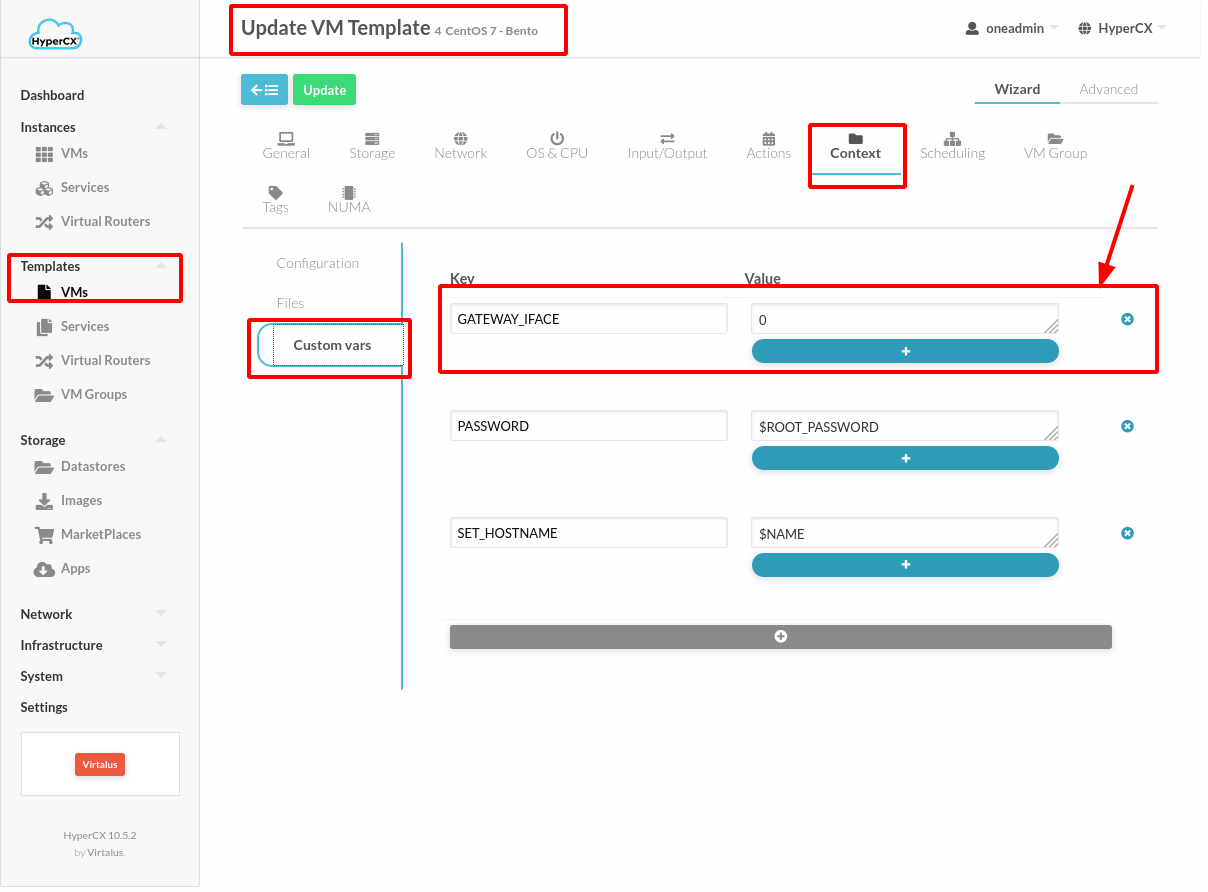
For Virtual Machines with multiple interfaces there is an important issue to keep in mind, which interface will manage the default gateway? Usually, the default gateway will be owned by the first interface, but there are cases, such as Centos, where it belongs to the last interface. Therefore, there may be cases in which, when users add a new interface, the default gateway will change. This could be avoided by adding a Custom Var within the virtual machine or Template configuration. Set GATEWAY_IFACE = The ID of the desired NIC.
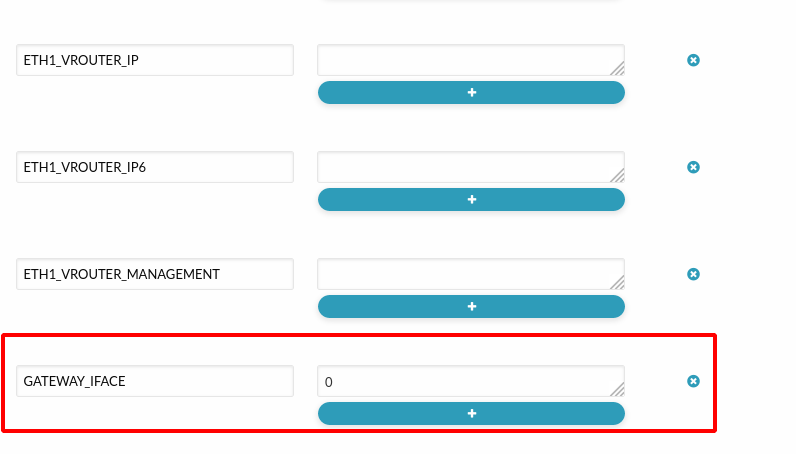
In addition, Templates could be modified with this parameter to ensure that all Virtual Machines that are deployed from it have solved this issue.
Note
For Windows user should manually configure the gateway inside the OS due to when Windows has 2 NICs it will automatically use gateway from those NIC, so user should Remove other gateway to use specific Gateway.
Automatic Network Selection
You can delay the network selection for each NIC in the Vm to the deployment phase. In this case the Scheduler will pick the Virtual Network among the available networks in the host selected to deploy the VM.
This strategy is useful to prepare generic VM templates.
To set the automatic selection mode, simply enable Automatic selection within Network section

Also you can add Requirements when this mode is actived.
Virtual Networks Templates
The Virtual Network Templates allows the end user to create virtual networks without knowing the details of the underlying network infrastructure. Typically the administrator sets the templates up with the required physical attributes, e.g. driver or physical device information and let the end user to add all the logic information like address ranges or gateway.
Virtual Network Templates can be instantiated several times and shared between multiple users.
Virtual Network Template Definition
A Virtual Network Template is a representation of a Virtual Network, so a template can be defined by using the same attributes available for a Virtual Network. Virtual Network Templates and Virtual Networks also share their required attributes depending on driver they are using (see the requirements here, Physical Network Attributes section).
When a network is created by instantiating a Virtual Network Template is associated to the default cluster. You can control which clusters the networks will be in with the CLUSTER_IDS attribute.
Using Virtual Network Templates
By default just oneadmin can create Virtual Network Templates, if other users need permissions for creating Virtual Network Templates it can be provided by creating a specific ACL.
Once the Virtual Network Template is created the access to it can be managed by its permissions. For example, if a end user needs to instantiate an specific template, it would be enough to give the template USE permission for others.
Operations
The available operations for Virtual Network Templates are the following:
- allocate
- instantiate
- info
- update
- delete
- chown
- chmod
- clone
- rename
- lock
- unlock
Note
Note that for using the newly created Virtual Network, the user needs to define an Address Range either during the Virtual Network Template instantiation or just updating the Virtual Network.
Private IPv4 VNET Template
Most clusters have a preconfigured VNET Template called Private IPv4. This VNET Template contains the most important elements from the underlying physical network infrastructure where the cluster is deployed. If this VNET template exists, it is recommended to create new VNETs by instantiating it as many times as needed instead of manually creating the new VNETs.
Security Groups
Security Group Definition
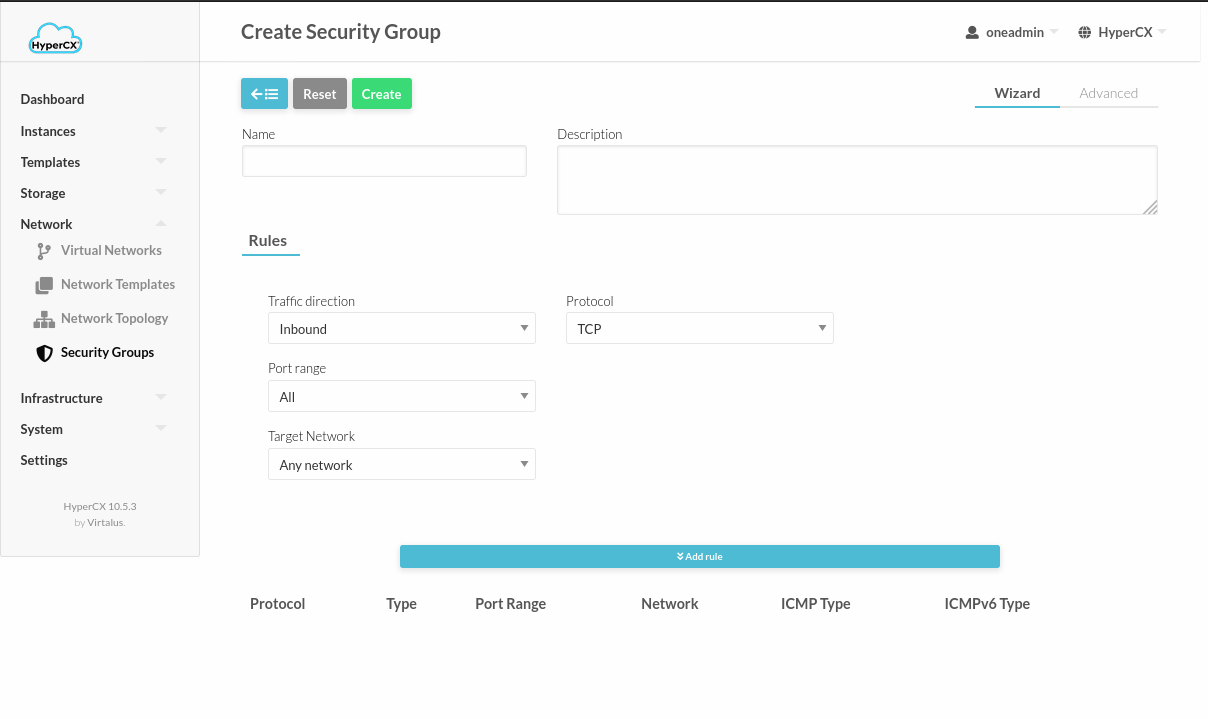
Security Groups define firewall rules to be applied on Virtual Machines. A Security Group is composed of several Rules. Each Rule is defined with the following attributes:
| Attribute | Type | Meaning | Values |
|---|---|---|---|
| PROTOCOL | Mandatory | Defines the protocol of the rule | ALL, TCP, UDP, ICMP, IPSEC |
| RULE_TYPE | Mandatory | Defines the direction of the rule | INBOUND, OUTBOUND |
| IP | Optional | If the rule only applies to a specific net. This is the first IP of the consecutive set of IPs. Must be used with SIZE | A valid IP |
| SIZE | Optional | If the rule only applies to a net. The number of total consecutive IPs of the network. Use always with IP | An integer >= 1 |
| RANGE | Optional | A Port Range to filter specific ports. Only works with TCP and UDP | (iptables syntax) multiple ports or port ranges are separated using a comma, and a port range is specified using a colon. Example: 22,53,80:90,110,1024:65535 |
| ICMP_TYPE | Optional | Specific ICMP type of the rule. If a type has multiple codes, it includes all the codes within. This can only be used with ICMP. If omitted the rule will affect the whole ICMP protocol. | 0,3,4,5,8,9,10,11,12,13,14,17,18 |
| NETWORK_ID | Optional | Specify a network ID to which this Security Group will apply | A valid networkd ID |
Create Security Groups
To create a Security Group, use the HyperCX web interface. Go to Security Groups within Network and click  .
.
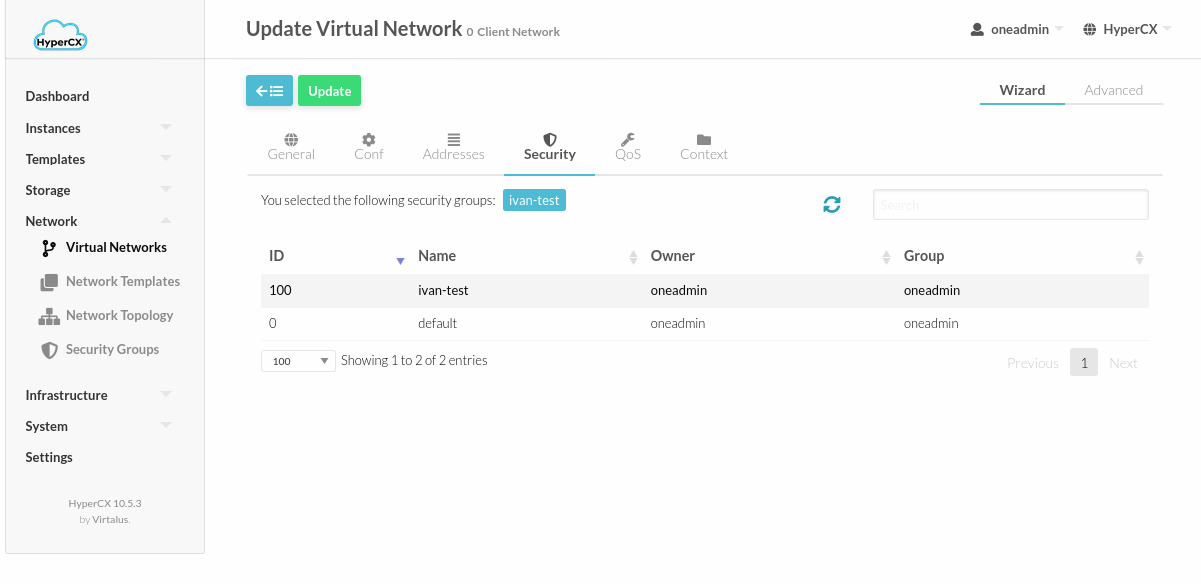
Using Security Groups
To apply a Security Group to your Virtual Machines, you can assign them to the Virtual Networks. For this, you must update the desired Virtual Network and assign the specific Security Group.
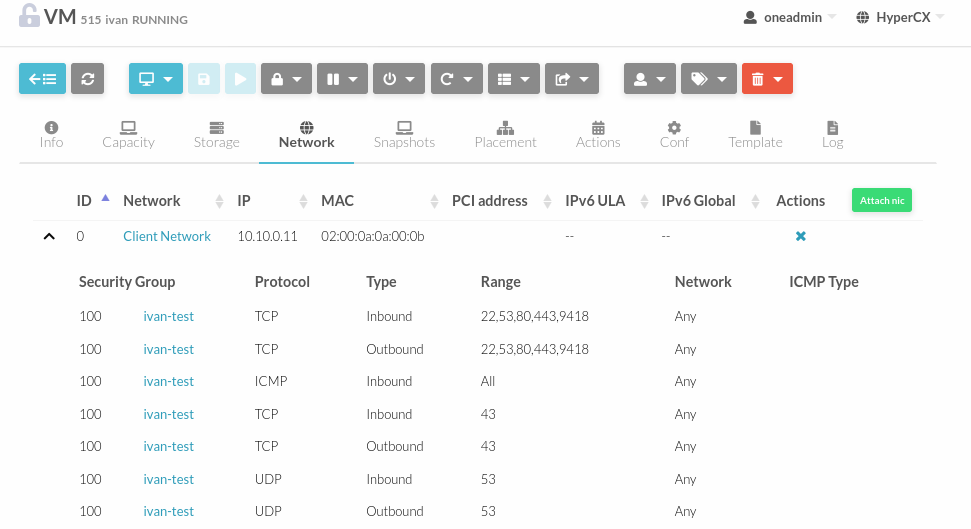
On the VMs, the Security Group will be displayed as follows:
Note
Note that for the desired Security Group to work you must uncheck the Default Security Group of the network.
Default Security Group
There is a special Security Group: default (ID 0). This security group allows all OUTBOUND traffic and all INBOUND traffic.
Whenever a network is created, the default Security Group is added to the network.
This means that you must edit every newly created network and remove the default Security Group from it. Otherwise even if you add other Security Groups, the default one will allow all traffic and therefore override the rest of the Security Groups. For this, update the desired Virtual Network and in the Security section, uncheck the Default Security Group.
Security Group Update
Security Groups can be updated to edit or add new rules. These changes are propagated to all VMs in the security group, so it may take some time till the changes are applied. The particular status of a VM can be checked in the security group properties, where outdated and up-to-date VMs are listed.
If the update process needs to be reset, apply again the rules, you can use the commit buttom.