HyperCX-pfSense
Overview
pfSense is a free and open source operating system for routers and firewalls. It can be installed on most commodity hardware, including old computers and embedded systems. It is typically configured and operated though a user-friendly web interface, making administration easy even for users with limited networking knowledge. Generally, one never needs to use terminal or edit config files to configure the router. Even software updates can be run from the web UI.
HyperCX-pfSense is based on pfSense, that provides VNFs (Virtual Network Functions) to HyperCX cloud users.The HyperCX-pfSense appliance support all features provided by pfSense, which can be found in the here.
The appliance allow users to deploy a ready-to-run a contextualized vrouter for HyperCX cloud with basic services configured, including real time and historic monitoring of metrics.
HyperCX-pfSense Key Customizations
-
Pre-configuration for standalone or HA deployments.
-
First web access will be via https://[public-ip]:8443
-
SSH access will use custom port 2222.
-
Preconfigured VPN using the OpenVPN server with hardened configuration, for security conscious users.
-
NAT Outbound configuration providing access to internet for the LAN.
Note
By default, standalone or primary node appliance will use the Dark Theme with Blue Login page, while the secondary node (HA deployment) will use the pfSense default Theme with Red Login page.
Following packages from pfSense repositories are installed by default:
| Package | Installed |
|---|---|
| Cron | ✅ |
| Iperf | ✅ |
| Shellcmd | ✅ |
| Sudo | ✅ |
| Openvpn-client-export | ✅ |
| HAproxy | ✅ |
| WireGuard | ✅ |
| Acme | ✅ |
| Suricata | ✅ |
| Backup | ✅ |
HyperCX-pfSense Monitoring
HyperCX-pfSense Appliance is also pre-configured with popular monitoring and data visualization tools such as Prometheus, Netdata and Grafana that provides
-
Real time monitoring with Netdata which can only be accessed through the preconfigured VPN tunnel, using the following link:
http://10.10.10.1:19999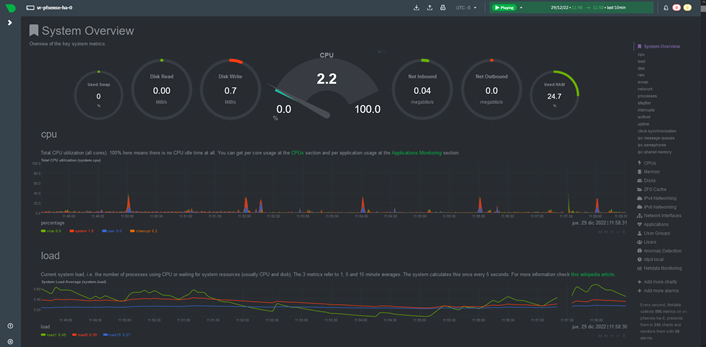
-
Historics monitoring with Prometheus + Node Exporter + Grafana. Grafana will come with provisioned dashboards for the appliance’s system status and its OpenVPN server. It is available only through the preconfigured VPN tunnel, using the following link and credentials:
http://10.10.10.1:3000Dashboard Access
Default user and password is admin : admin
View Dashboard
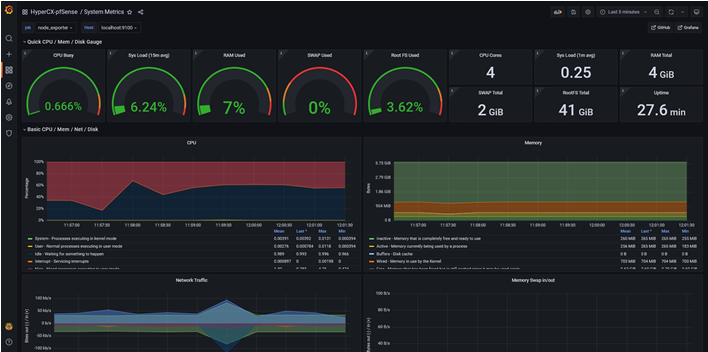
Once in, you need to enable dashboards. To enable/view them go to Dashboard > Browse > HyperCX-pfSense > System Metrics or Openvpn Metrics
System Metrics Dashboard:
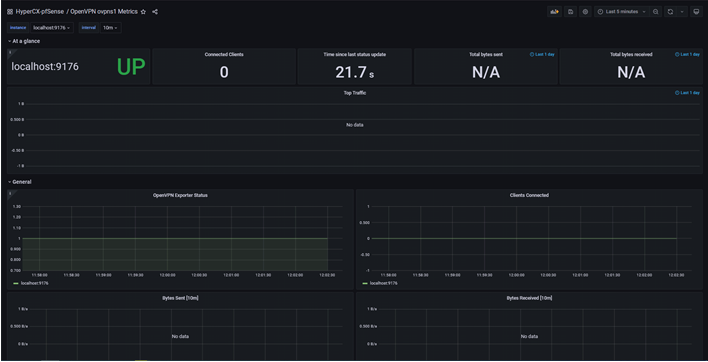
OpenVPN ovpns1 Metrics Dashboard:
WARNINGS
-
HyperCX-pfSense appliance should not be upgraded from the WebUI, as it may break the functionality of the appliance
-
For standalone deployments only two interfaces (WAN and LAN) are contextualized, while for HA deployments a third interface (PFSYNC) will be contextualized. More interfaces could be added to the appliance, but none of them will be contextualized.
-
The appliance is intended for new deployments. Configurations from other pfSense instances should not be imported, as it may break the appliance. However, they can be imported only if the config file belongs to another HyperCX-pfSense appliance of the same version.
Obtaining HyperCX-pfSense appliance
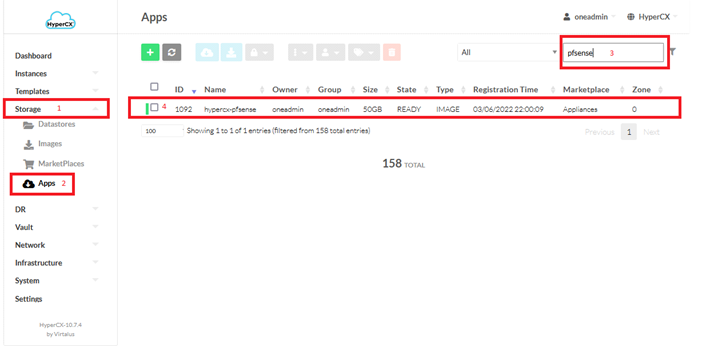
HyperCX-pfSense appliances can be obtained from Virtalus marketplace. The appliance name is hypercx-pfsense and the version can be seen under Info tab.
- Go to the Storage section,
- Click on Apps tab,
- Search the appliance
-
Click on appliance
-
Confirm the correct version and click on Import to Datastore

-
Change appliance name or leave as it is
- Select the Datastore
-
Click on Download
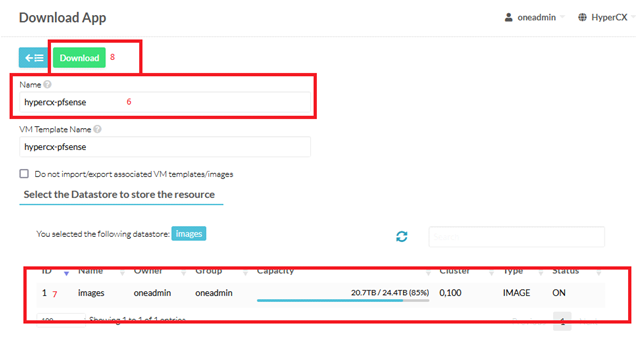
-
Now go to Images tab, you should now see your appliance. Click on refresh button to check the status
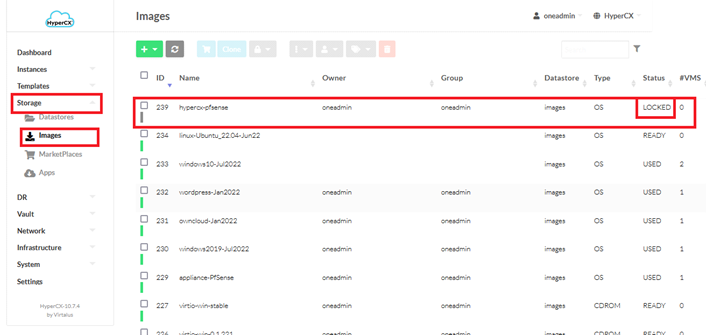
Important
You will need to wait until the status is changed from LOCKED to READY.
Instantiating HyperCX-pfSense in Standalone mode
In order to instantiate a single instance of a vRouter
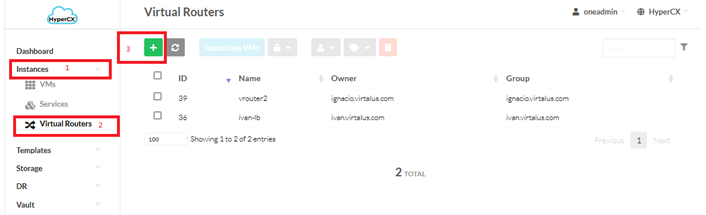
- Head over to Instances section,
- Click on the Virtual Routers tab
-
Click on the ➕ button
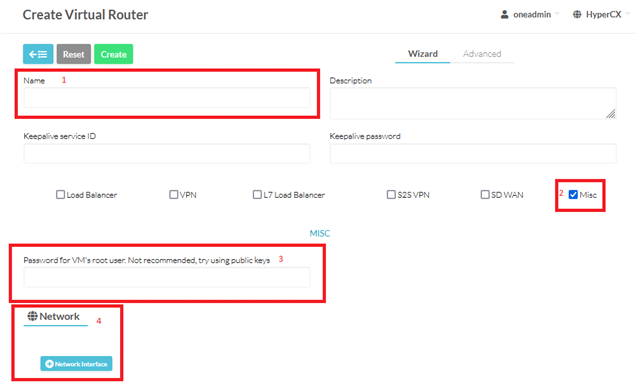
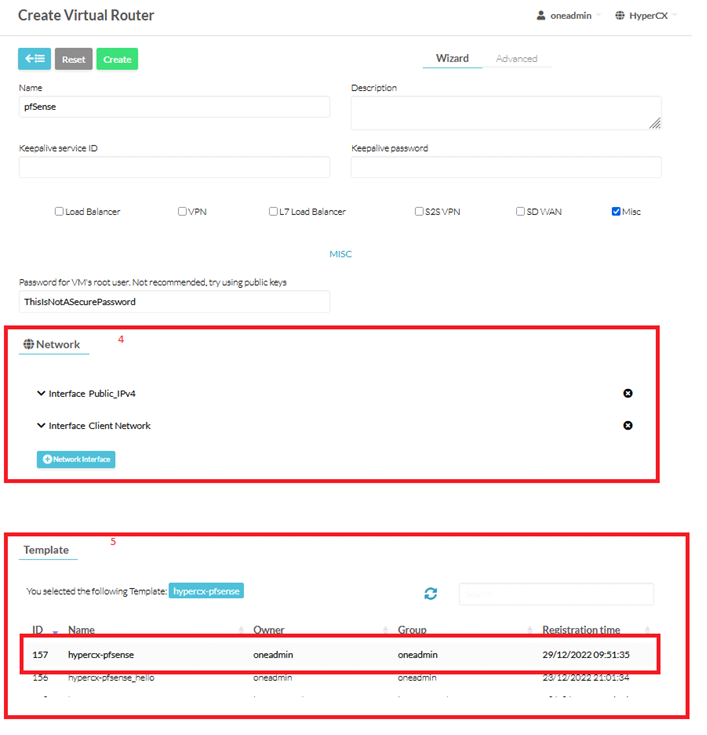
Now the user must fill some fields:
-
Name: the name of the vRouter appliance.
-
Password: You can set a password for the admin user here. This passphrase will be the one you will use on the webUI for the admin user. By default, its value is admin*123
-
Network Interface: The user will need to attach a minimum of 2 NICs. In order to use correctly there is a condition to meet: the first NIC will always be the one dedicated to be the WAN and the second NIC will always be the LAN one.
-
-
Now, in the Template section make sure that you select the hypercx-pfsense template
-
Once every step is completed just click on the Create.
Tip
You can go into the VNC connection with the vRouter and see what’s happening under the hood.
Note
The hypercx-pfsense appliance will take few minutes to fully self-configure and it might restart once to apply all configurations.
-
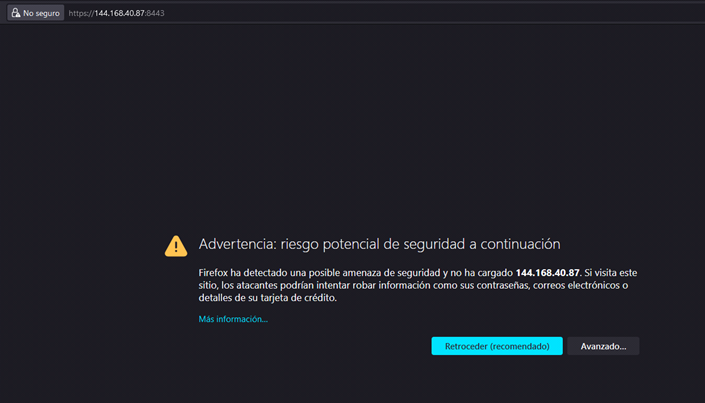
After the auto-configuration process is complete, open WebUI using the public IP in your browser, with port 8443. For example, in this case
https://144.168.40.87:8443 -
Your web browser may show certificate warning, since appliance use self-signed certificate, just click on Advance and then Accept and Continue
-
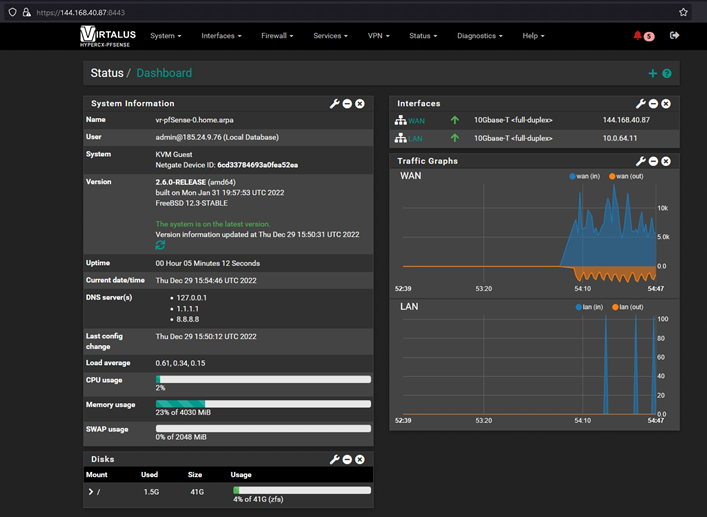
Enter your User and Password (the one you set in step 3)
-
That's it! your hypercx-pfsense appliance is now ready.
Instantiating HyperCX-pfSense in High Availability mode
High Availability on pfSense software is achieved through a combination of features:
- CARP for IP address redundancy
- XMLRPC for configuration synchronization
- pfsync for state table synchronization
With this configuration in place nodes act as an “active/passive” cluster with the primary node working as the master node and the secondary node as backup, taking over if the primary node fails.
The most common High Availability cluster configuration includes two nodes. It is possible to have more than two nodes in a cluster, but they do not provide a significant advantage.
Configurations with more than two nodes are not officially supported.
It is important to distinguish between the three functions (IP address redundancy, configuration synchronization, and state table synchronization) because they happen in different places.
Configuration synchronization and state synchronization happen on the sync interface, directly communicating between firewall units. CARP heartbeats are sent on each interface with a CARP VIP. Failover signaling does not happen on the sync interface, but rather it happens on every CARP-enabled interface.
On pfSense HA will exist two unique roles:
- Primary
- Secondary
About the states, there will exist two as well:
- Master
- Backup
There are 5 possible cases on an HA deployment:
-
Case 1
- Primary node healthy: It has the state “Master”. Configurations will be synced from primary node to secondary node.
- Secondary node healthy: It has the state “Backup”. Is waiting his chance to become in the master, if the primary node is offline.
-
Case 2
- Primary node with troubles: State transition from “Master” to “Backup”.
- Secondary node healthy: State transition from “Backup” to “Master”. It maintains the availability of the services.
-
Case 3
- Primary node gets recovered: Return to its original state “Master”.
- Secondary node healthy: Return to its original state “Backup”. If changes were made in the secondary node, while the primary was DOWN, those changes will be gone once the primary node be UP again (secondary node CARP interfaces will return to role BACKUP). This is how it works the pfSense HA.
-
Case 4
- Primary node healthy: It has the state “Master”.
- Secondary node with troubles: HA is gone, failover node is out and services are still up but they will be affected if the primary node get offline.
-
Case 5
- Primary node and secondary node are healthy and both of them assume the state “Master”: This is probably due to problems in the sync between both pfSenses.
Important
Before you continue with the instantiation of the vrouter in HA, you need to set up a Virtual Network for the PFSYNC.
Create a new Network
Go to Network section > Network Templates > Select Private IPv4 > Click on Instantiate
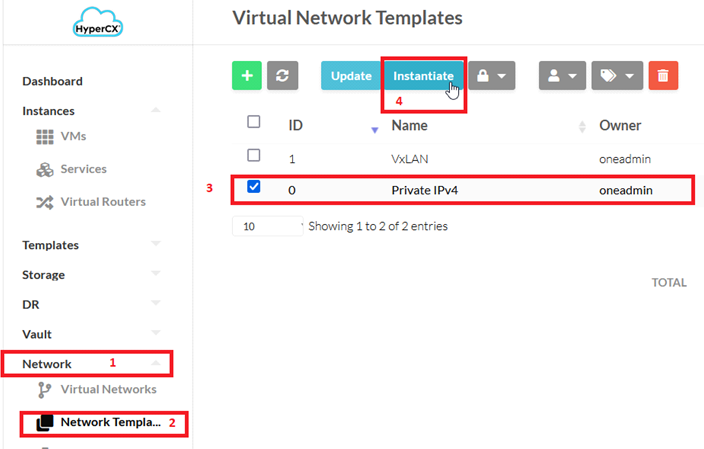
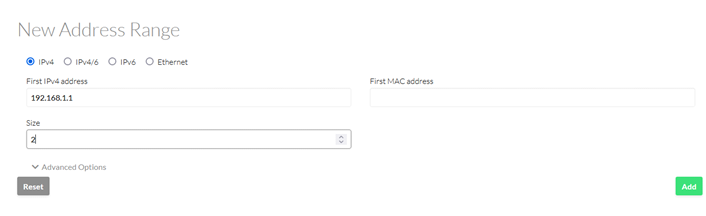
Set the name you want for the virtual network and add the address range (a /30 subnet should be enough, as there will be only 2 pfsense nodes):
The rest is the same for every virtual network instantiated.
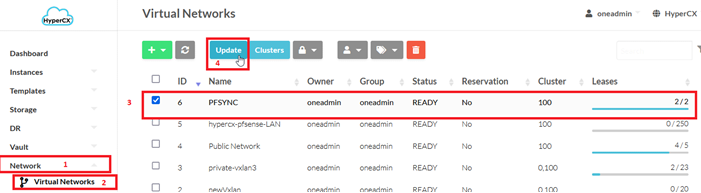
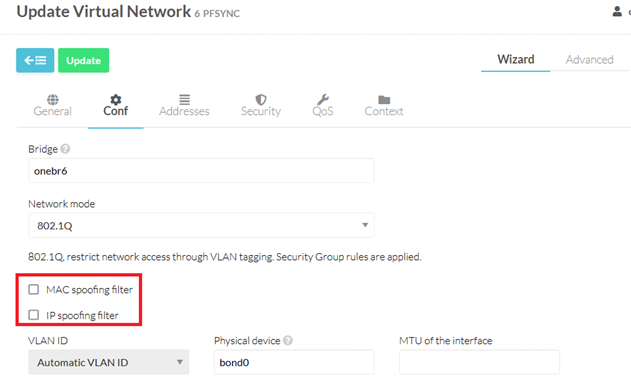
Once the vnet is created, you need to edit it and make sure the MAC SPOOFING and IP SPOOFING are disabled. Same for every new interface added to the vrouter.
With the previous steps done, you are ready to continue with the vrouter instantiation.
Instantiate a vRouter
In order to instantiate a vRouter just head into the Instances section then click on the Virtual Routers tab and click on the ➕ button
Now the user must fill some fields:
- Name: the name of the vRouter appliance.
-
Password: You can set a password for the admin user here. This passphrase will be the one you will use on the webUI for the admin user. By default it’s value is admin*123
-
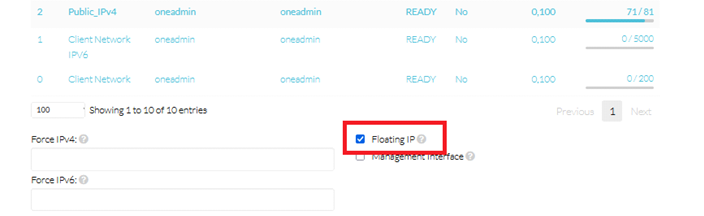
Network Interface: The user will need to attach a minimum of 3 NICs. In order to use correctly there is a condition to meet: the first NIC will always be the one dedicated to be the WAN, the second NIC will always be the LAN one and the last NIC will be the sync NIC. The WAN and the LAN NICs will need to, while attaching, select the FloatingIP checkbox. If the user does not meet this requirement the HyperCX-pfSense will not behave as should be expected. A vrouter based on hypercx-pfsense appliance will require a minimum of 3 Public IPs: one for each WAN pfsense node and the other for the WAN VIP CARP.
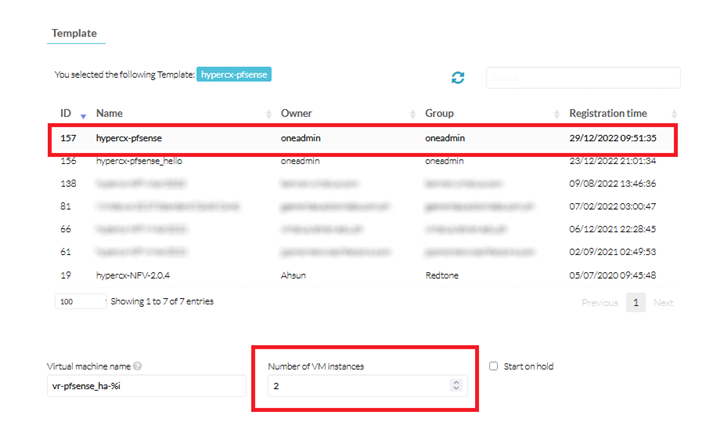
In the Template section make sure the hypercx-pfsense template is selected and Number of VMs instances is set to 2:
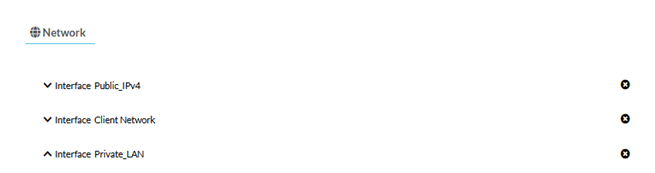
Now we can access to the vitual IP assigned to our vRouter, which will redirect us to the Master in our HA pfSense cluster. That IP can be manually fixed or we can get it from the Network tab:

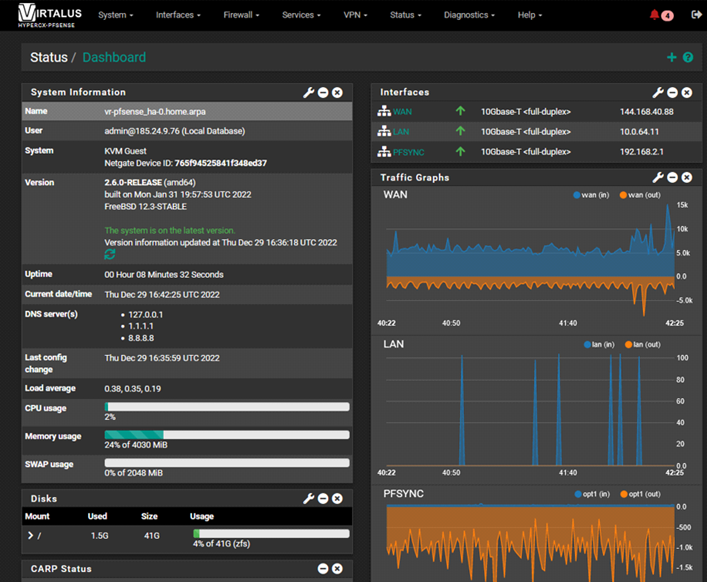
Finally, you will be able to view WebUI for the primary node of the hypercx-pfsense HA cluster
and the webUI for the secondary node of the hypercx-pfsense HA cluster
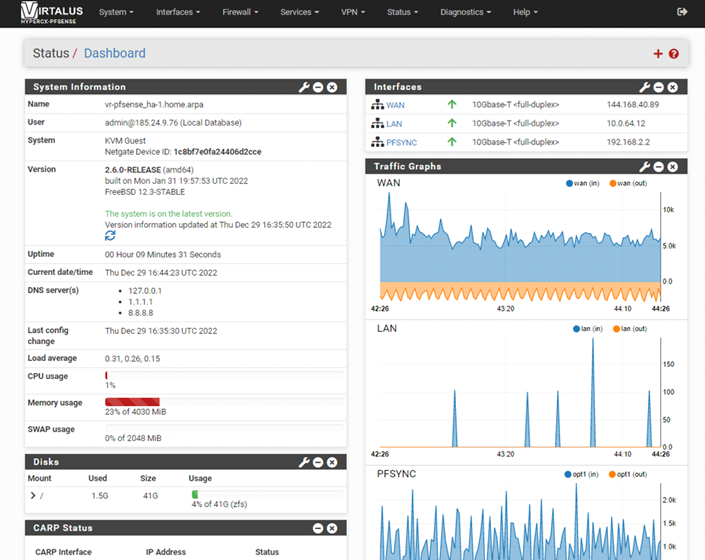
Note
WebUI of the master and the secondary node is different
Changing contextualized values of HyperCX-pfSense Appliance
Contextualization will allow the following changes from the HyperCX frontend:
-
Changing the password of the user
root(admin), through the contextualization variablePASSWORD. In case of being in HA, make the change from the primary node. -
Change of the hostname, through the contextualization variable
SET_HOSTNAME. -
Change of the domain, through the contextualization variable
SET_DOMAIN. -
Change of IP of the WAN and the LAN. If the WAN IP changes, the configuration of the OpenVPN client "ovpnc2" will be updated, specifying the new WAN IP address, which is where the OpenVPN server "ovpns1" serves.
-
The WAN gateway will always take the value of the gateway, of the virtual network corresponding to the Public Network (it must not be modified).