VM Management
Overview
HyperCX allows users to create new VMs using prebuilt templates and they are defined in a way that multiple VMs can be deployed using the same template and context. Creating new VMs can be as easy as a click of a button everything is predefined by us and users just need to initialize the template. Having control over a running VM is quite important and this section defines some important aspects.
Create Virtual Machine
Simply create the VM with steps below:
1. Click Instance > VMs > Create VM. 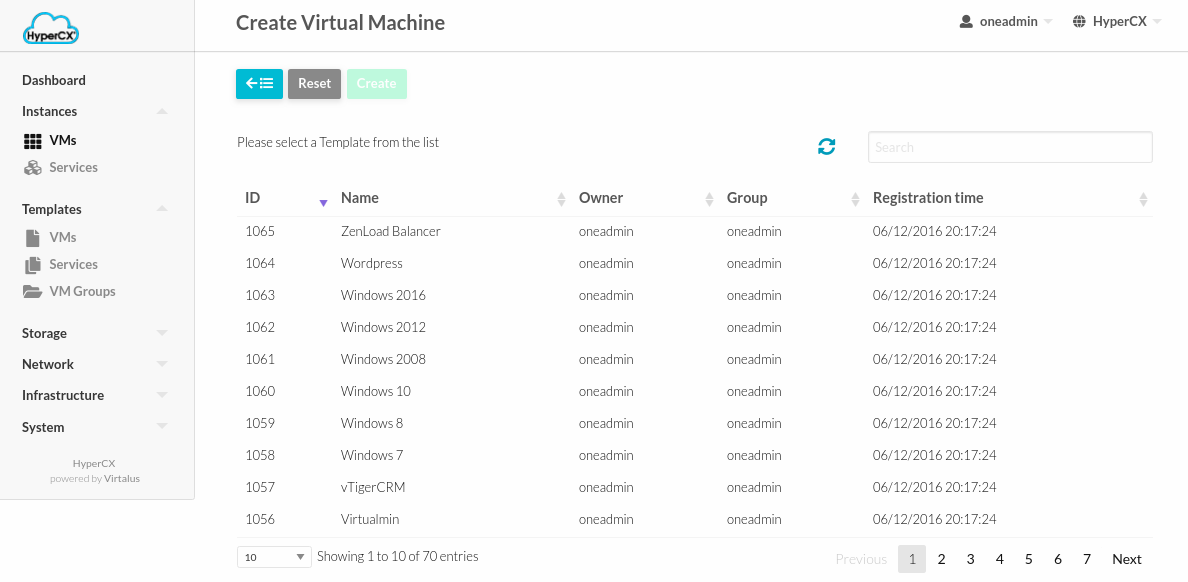
- Select the Template.
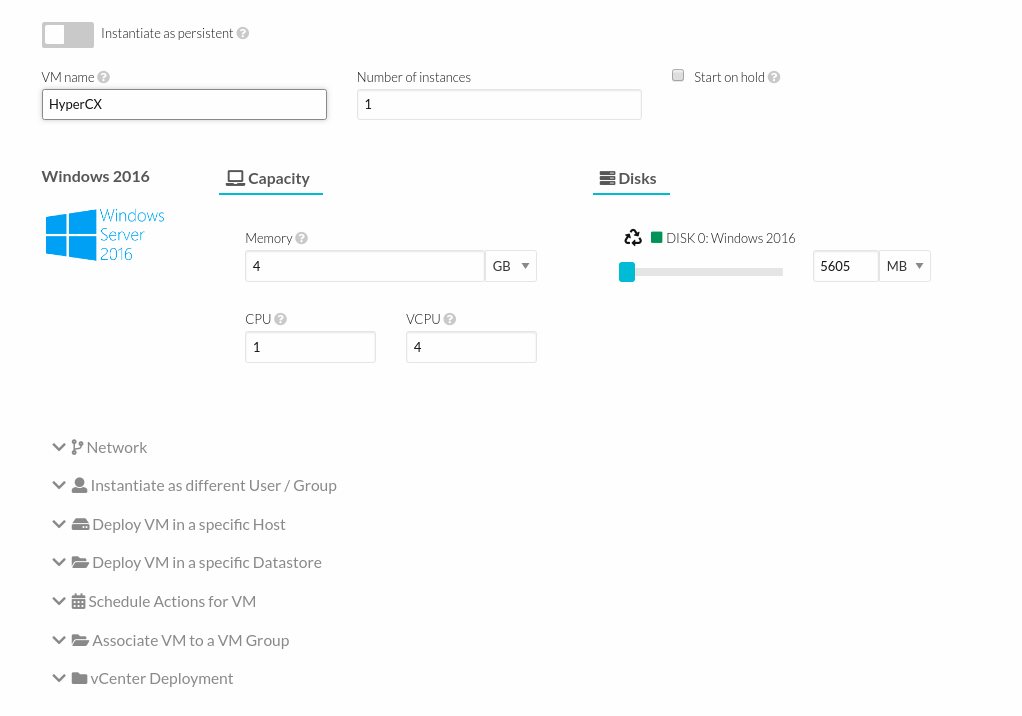
-
Adjust name for VM, Memory, CPU, VCPU and Storage.
-
Then Create.
Note
For templates downloaded from a market, the name of the VM will be used as hostname inside the VM. This behavior can be changed.
Note
For appliances downloaded from the marketplace, it will be possible to set a root (or Administrator password in case of Windows) during instantiation. In the case of Linux VMs, it is not possible to access the VM via ssh using the root account and the specified password for security reasons. For immediate ssh access to the root account, a public key must be configured either for the user or the template. Root password can only be used from the VNC console.
Accessing the VM
No appliance obtained from a marketplace has a default username or password. It is possible to specify a password for the root user (or Administrator) during instantiation, but, except for Windows VMs, this is not recommended. Users are encouraged to use ssh public keys. Root password or ssh public keys can be modified after the VM was created by reconfiguring the VM.
SSH access for Linux based VMs
HyperCX offers password-less authentication by default so all a User needs to do is provide their public SSH key(RSA SSH-2 preferably) on the HyperCX portal, then initialize the VM and once it’s initialized user can access the VM using their private key and user as root. SSH public keys can be defined either in the user configuration (this is the recommended approach) or directly in the VM template.
Instructions on how to generate SSH public keys on Windows can be found here.
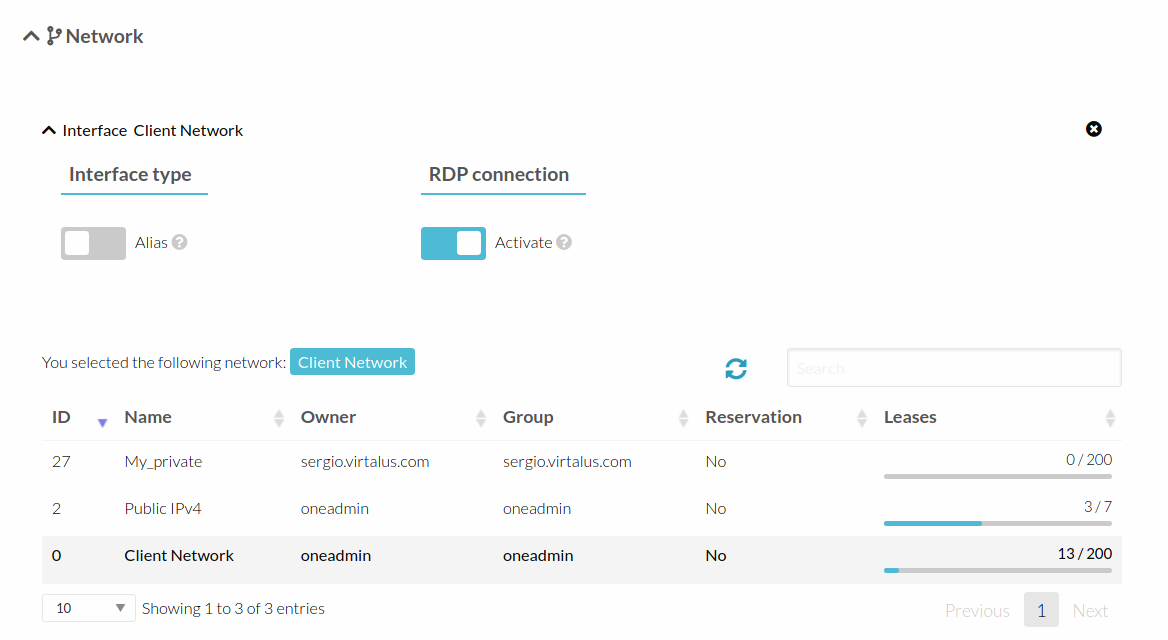
RDP access for Windows based VMs
Windows VMs can be accessed using RDP. By using this feature, HyperCX will provide a RDP session configuration file.
In order to enable this feature, RDP most be selected in the specific NIC it will be used when instantiating the VM. Note that RDP can be activated on a single NIC only. If this option is enabled in several NICs, the RDP configuration file will only contain the IP of the first NIC where it was enabled.
 .
.
Once the VM is instantiated, users will be able to download the RDP configuration file.
 .
.
Important
RDP establishes a connection directly to the VM's OS. This is different to the VNC connection, which goes directly through the hypervisor. This means that RDP connections will only work after the OS has started. When deploying a Windows VM for the first time, this processs will take a couple of minutes since the OS will be automatically configured on the first run. VNC connection can be used to check the process. Also, RDP port can not be blocked, either by a firewall inside the VM or HyperCX's Security Groups.
Note
Default user will be Administrator and the password that was configured when creating the VM will also be reflected in the RDP session configuration file.
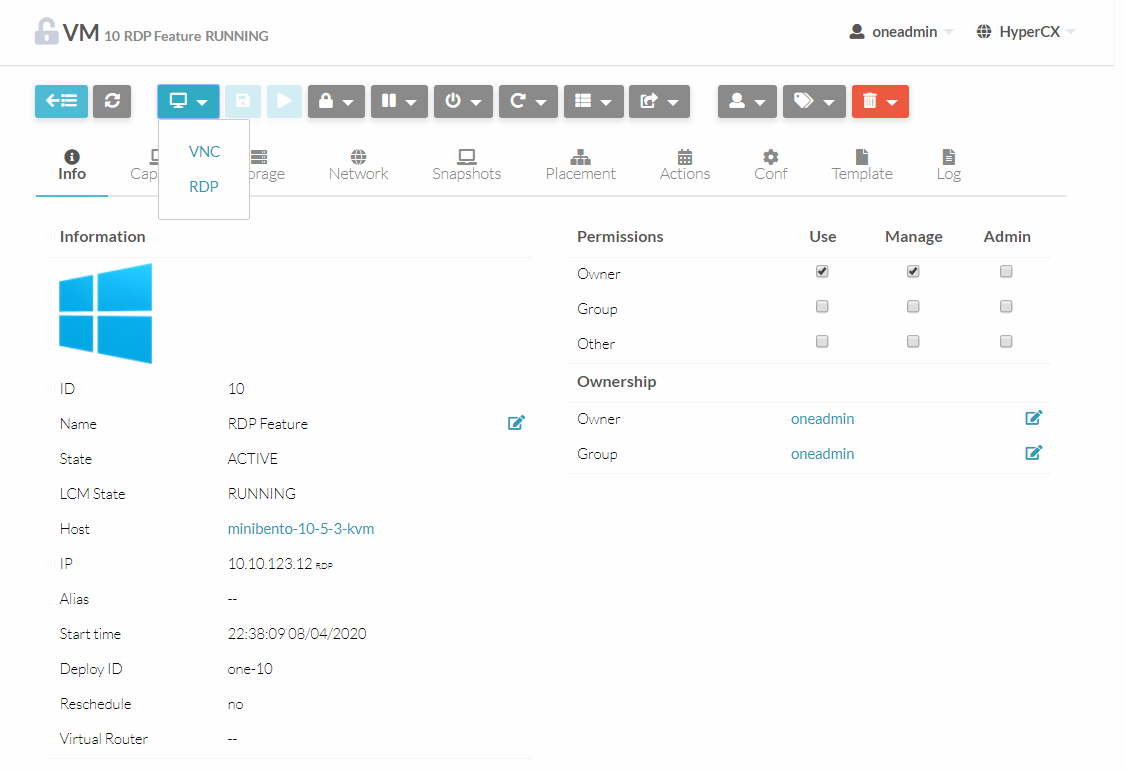
VNC access for any platform
HyperCX implements a VNC client to connect out-of-band to the VM. Any VM can be accessed using VNC by clicking on 
The VNC endpoint varies depending on the hypervisor:
-
For KVM, the endpoint is the VNC server integrated into QEMU. This will show the video output from the VM.
-
For LXD, the endpoint is an interactive session using the output from “lxc exec $container login”.
VNC can be used when a root password was defined for the VM. In this case, root passwords can not be used via ssh for security reasons, but they will work on the VNC console.
Reconfiguring a VM
Some settings inside the VM are configured directly by HyperCX through the contextualization process. This settings should not be configured directly inside the VM since they will be overwritten after a reboot or a recontext operation. Instead, they must be modified through HyperCX. This process can be done live, there is no need to shutdown the VM.
In order to reconfigure a VM, go to the Conf tab inside the VM and click Update COnfiguration:
 .
.
Contextualization options are defined inside the Context tab:
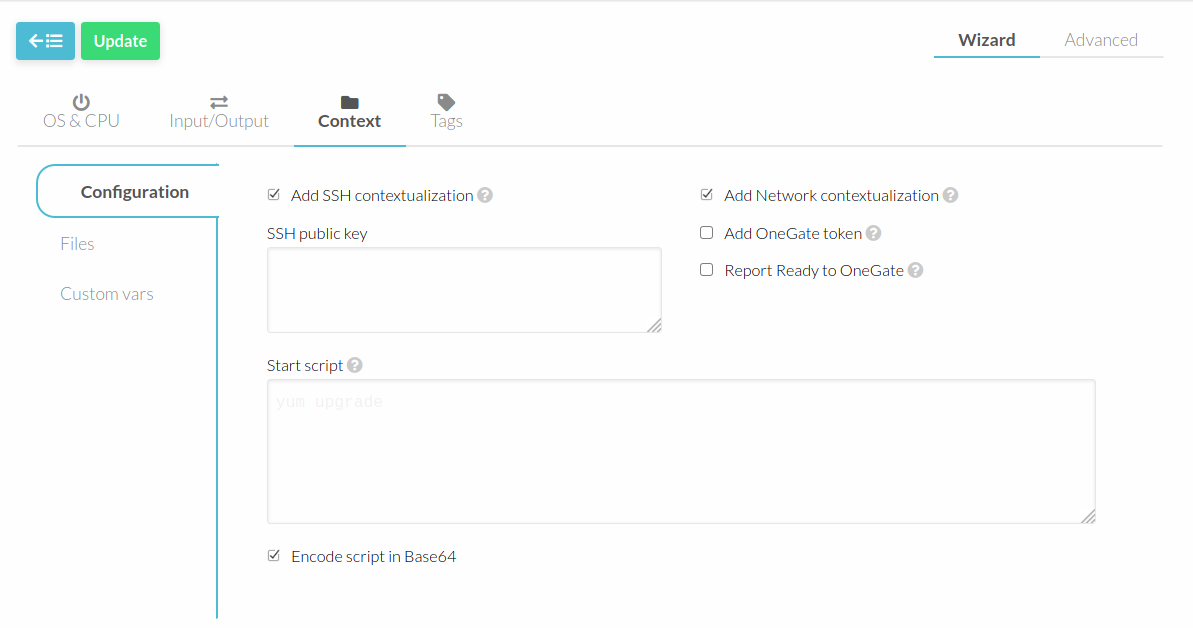 .
.
Resizing Virtual Machine Capacity
You may resize the capacity assigned to a Virtual Machine in terms of the virtual CPUs, memory and CPU allocated. VM resizing can be done in any of the following states: POWEROFF, UNDEPLOYED.
If you have created a Virtual Machine and you need more resources, the following procedure is recommended:
-
Perform any operation needed to prepare your Virtual Machine for shutting down, e.g. you may want to manually stop some services
-
POWEROFF the Virtual Machine
-
Resize the VM
-
Resume the Virtual Machine using the new capacity
Resizing Virtual Machine Disks
To adjust the size of a disk in the VM can be done live or with the VM turned off. Go to the VM menu and in the Storage section click on  .
.
A window like the one below will be displayed showing the original size of the VM, increase space and click on resize.
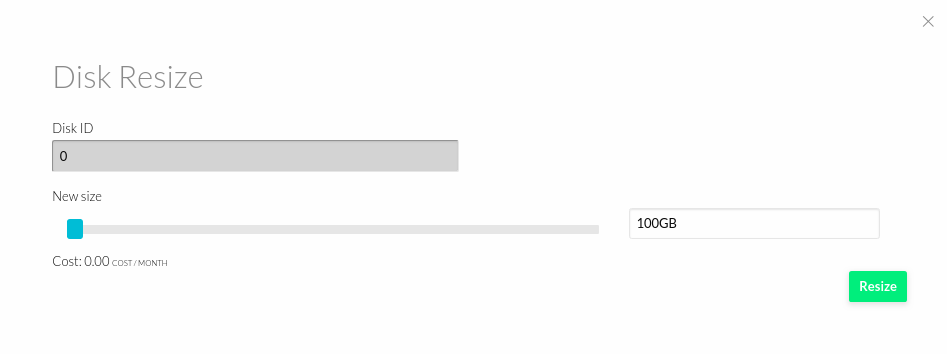 .
.
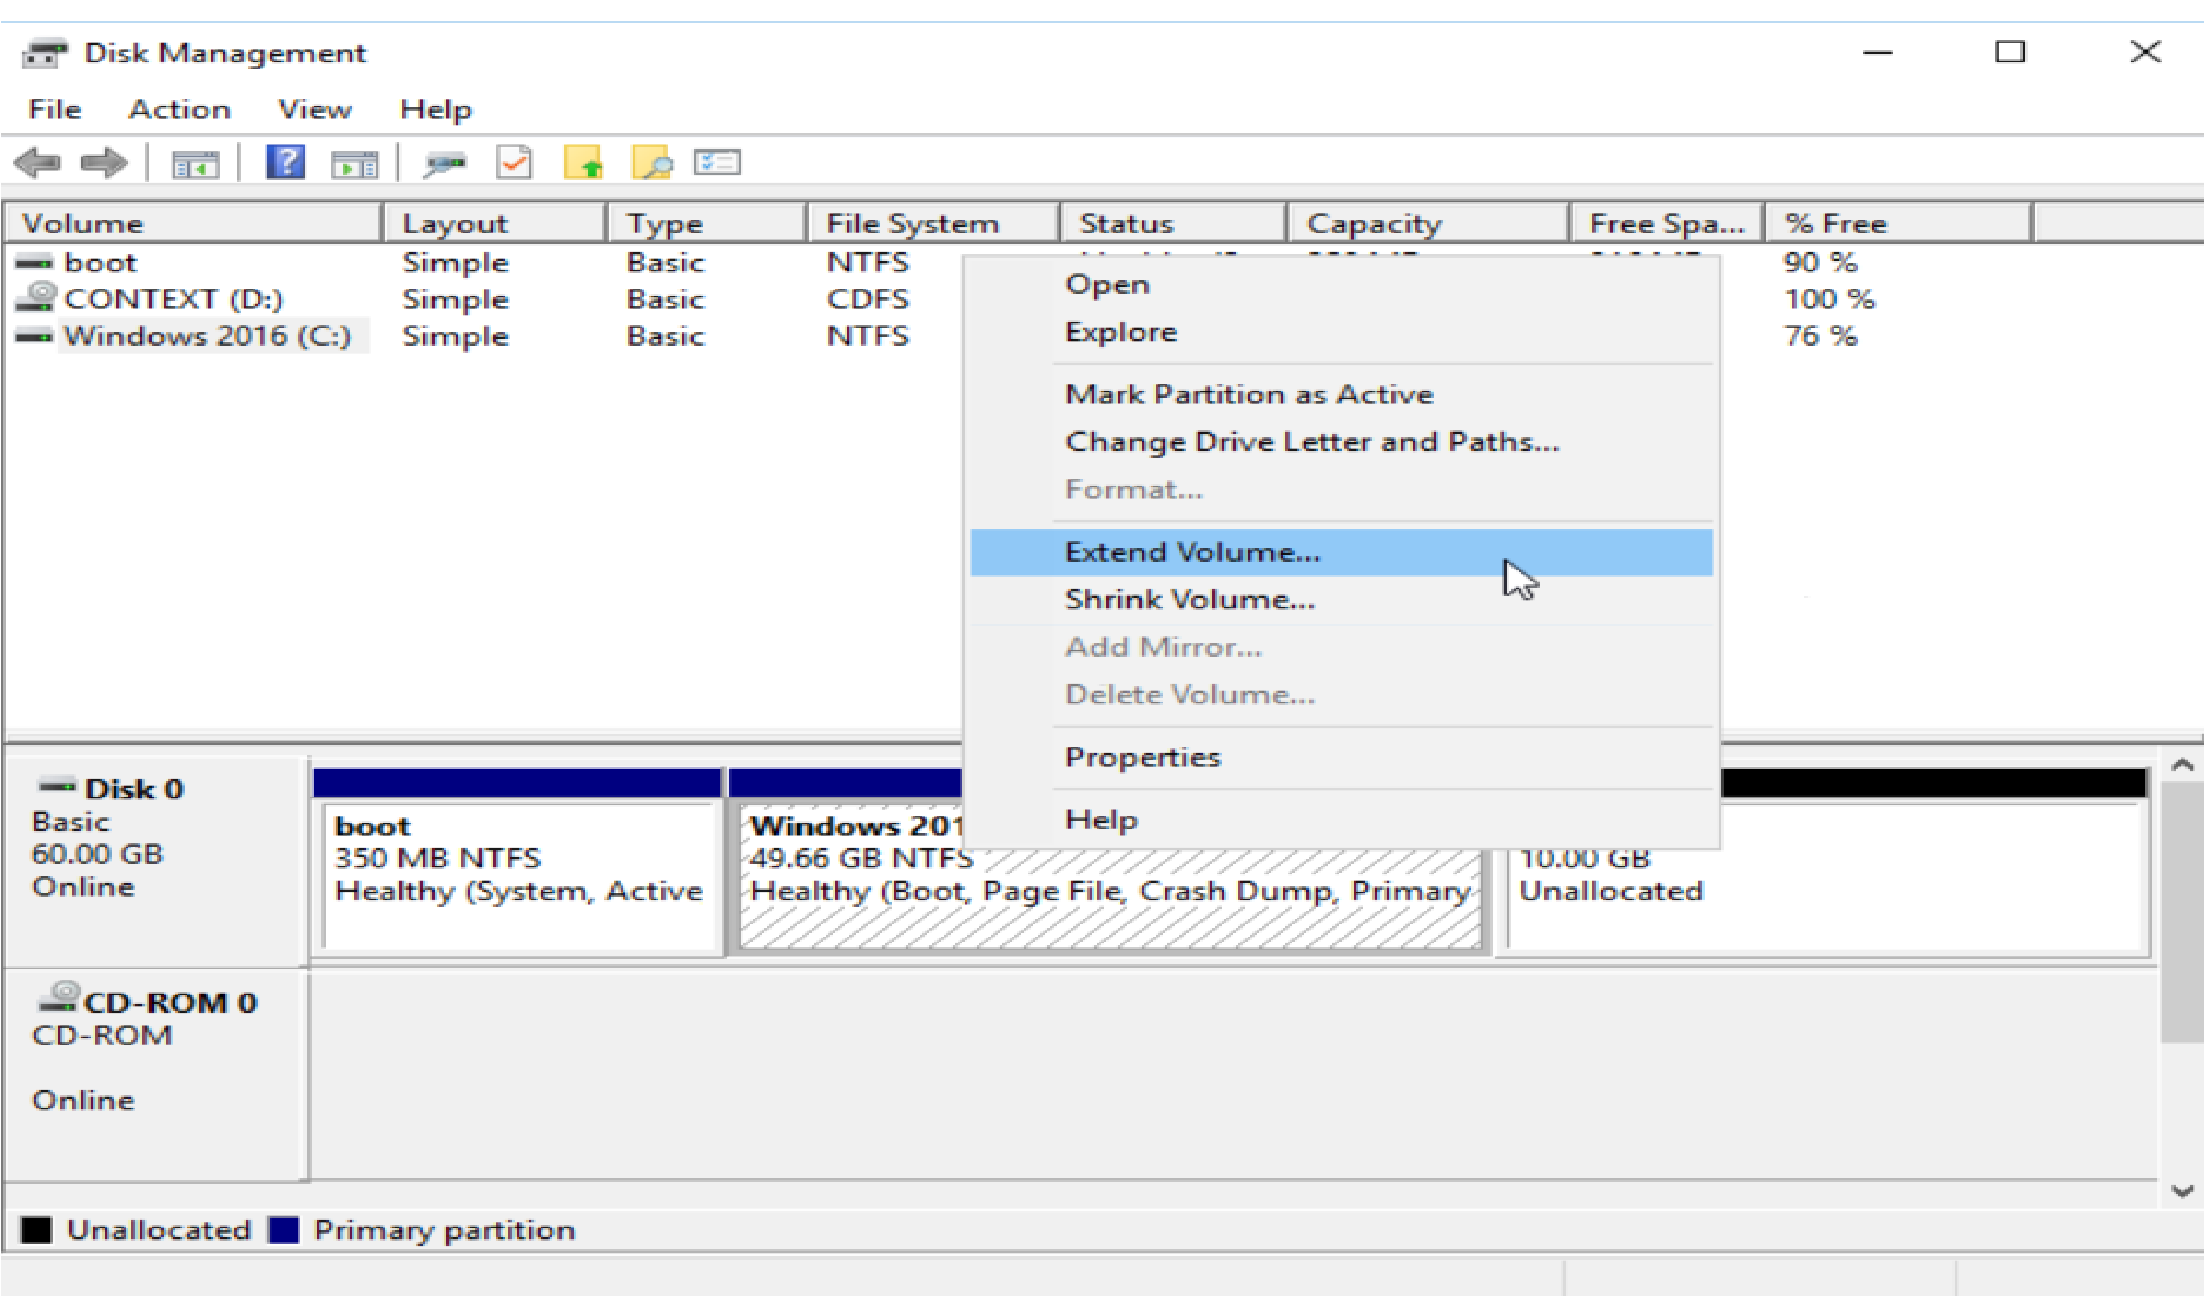
For Linux based VMs and containers nothing else needs to be done. New capacity will be reflected automatically inside the VM/container. For Windows Server after resizing the disk through portal, user will need to expand the partition manually inside the Windows VM by following below steps:
-
Search Disk Management.
-
Check if there is an unallocated space in disk, if not click Action > Refresh.
-
Select the disk that you want to resize.
-
Right Click and Choose Extend Volume.
-
Adjust Size for Disk.
-
Finish.
 .
.
Important
When the VM has a snapshot created on the disks, it is not possible to resize. To do this it is necessary to remove the snapshot.
Warning
Live disk resize is not supported for LXD containers
Adding Virtual Machine Disk
To attach a disk to a VM go to the VM menu, in Storage click on  .
In the next menu select an existing image or a new empty disk (volatile disk) to be attached to the VM, this process can be done live.
.
In the next menu select an existing image or a new empty disk (volatile disk) to be attached to the VM, this process can be done live.

It is recommended to attach non-persistent images instead of volatile disks. If a volatile disk is used, disk save-as feature will not be supported since there is no image associated to the virtual disk. Also, when attaching a non-volatile disk, it is recommended to use qcow2 as Filesystem format and Virtio as BUS.
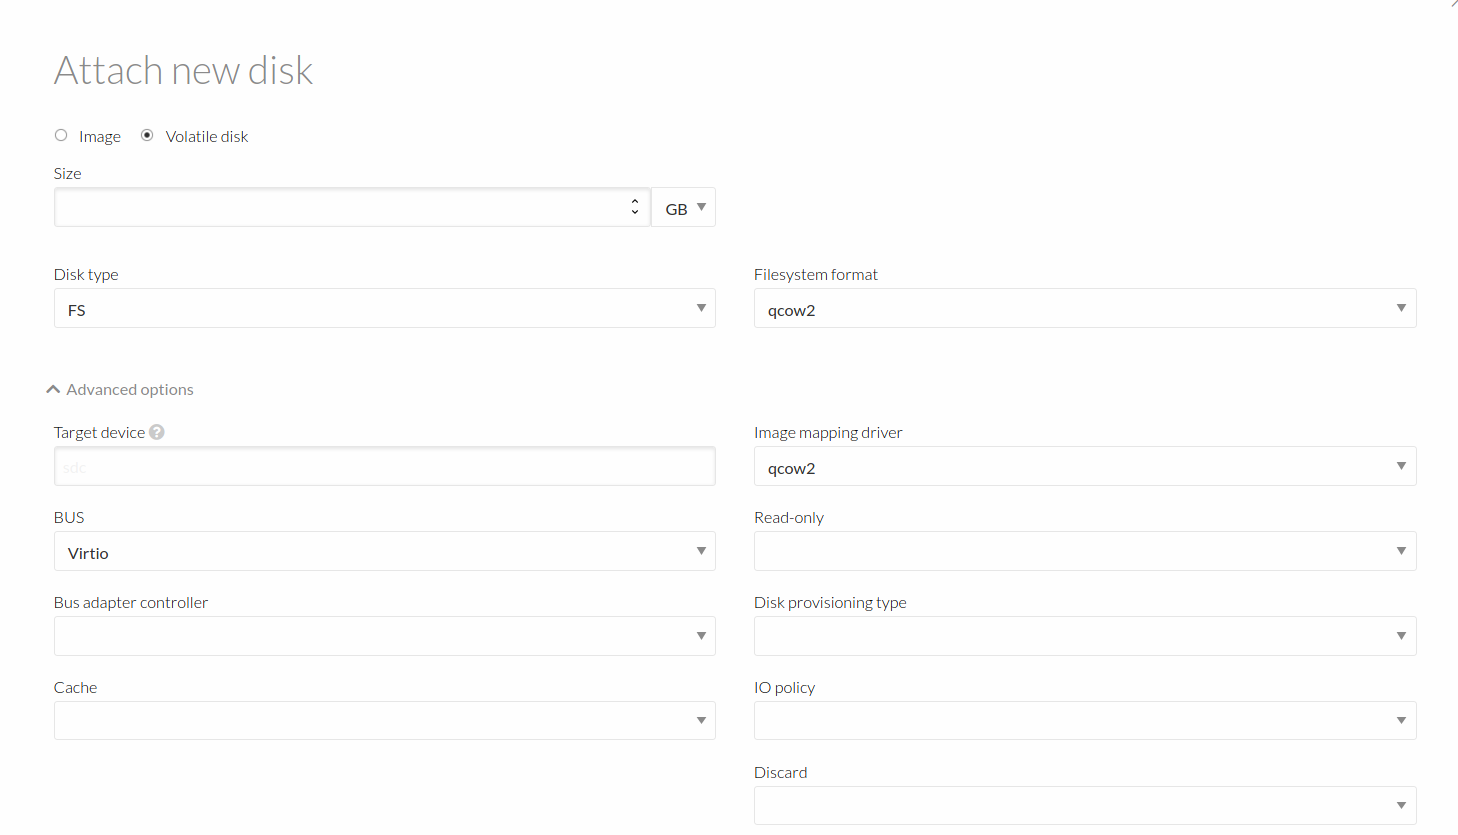
Note
When you selecting a volatile disk (or a new datablock) on HyperCX, it contains no format. Because of this, attaching volatile disks or empty datablocks to containers is not supported at this moment.
Modifying CPU Topology
To modify the CPU Topology of a VM go to the VM menu, in Conf click on  .
In the next menu select Tags and add the following lines within Data box.
.
In the next menu select Tags and add the following lines within Data box.
<cpu mode='host-model'>
   <topology sockets='2' cores='2' threads='1'/>
</cpu>
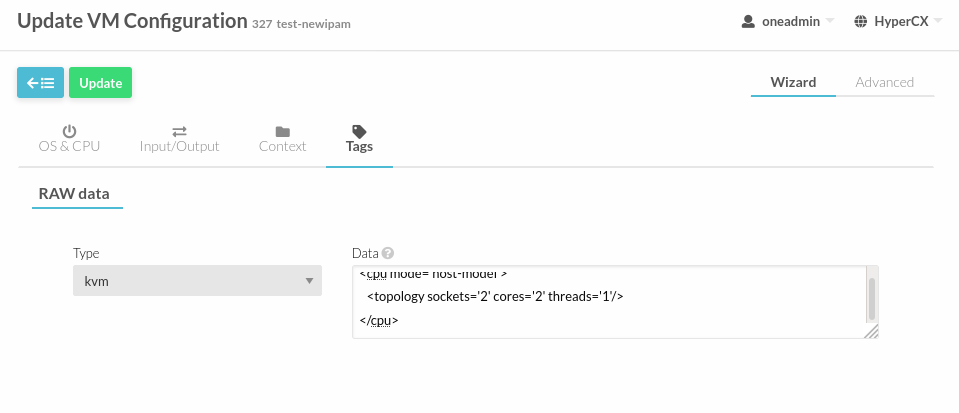
Note
The VM must be powered off for the changes to take effect.
Lock and unlock
Lock and unlock is a function that can be applied in VMs, it works as follows:
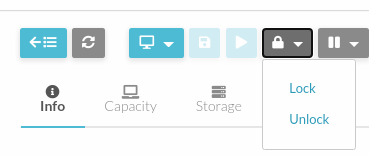
-
Lock: Locking a VM allows any action that you want to apply to the VM to be denied, for example, if you accidentally delete the VM, this function will not complete since it is blocked. This action is recommended in order to protect the VM from actions that can be accidentally applied. The states of the VM are also blocked when they are triggered from the frontend.
-
Unlock: When a VM is deployed the default state is unlocked, this action will always be active in new deploys and will allow any action to the VM.
Note
oneadmin user is not affected by locks and can perform the operation in any case.
Search VM
User can search or filter VMs. This is specially usefull on large environment with many VMs.
They value must be one of the following: - Date Created - Group - Host - ID - IPs - Locked VM - Name - Owner - Status
For example, for searching VM with a spesific IP address:
 .
.
Terminating VM Instances
You can terminate an instance with the onevm terminate command, from any state. It will shutdown (if needed) and delete the VM. This operation will free and destroy the resources (images, networks, etc) used by the VM. This operation can not be rolled back.
If the instance is running, there is a --hard option that has the following meaning:
-
terminate: Gracefully shuts down and deletes a running VM, sending the ACPI signal. Once the VM is shutdown the host is cleaned, and persistent and deferred-snapshot disk will be moved to the associated datastore. If after a given time the VM is still running (e.g. guest ignoring ACPI signals), HyperCX will returned the VM to the RUNNING state. -
terminate --hard: Same as above but the VM is immediately destroyed. Use this action instead of terminate when the VM doesn’t have ACPI support.
Pausing VM Instances
There are two different ways to temporarily stop the execution of a VM: short and long term pauses. A short term pause keeps all the VM resources allocated to the hosts so its resume its operation in the same hosts quickly:
-
suspend: the VM state is saved in the running Host. When a suspended VM is resumed, it is immediately deployed in the same Host by restoring its saved state. -
poweroff: Gracefully powers off a running VM by sending the ACPI signal. It is similar to suspend but without saving the VM state. When the VM is resumed it will boot immediately in the same Host. -
poweroff --hard: Same as above but the VM is immediately powered off. Use this action when the VM doesn’t have ACPI support.
You can also plan a long term pause. The Host resources used by the VM are freed and the Host is cleaned. Any needed disk is saved in the system datastore. The following actions are useful if you want to preserve network and storage allocations (e.g. IPs, persistent disk images):
-
undeploy: Gracefully shuts down a running VM, sending the ACPI signal. The Virtual Machine disks are transferred back to the system datastore. When an undeployed VM is resumed, it is then moved to the pending state, and the scheduler will choose where to re-deploy it. -
undeploy --hard: Same as above but the running VM is immediately destroyed. -
stop: Same as undeploy but also the VM state is saved to later resume it.
When the VM is successfully paused you can resume its execution with:
- resume: Resumes the execution of VMs in the stopped, suspended, undeployed and poweroff states.
Rebooting VM Instances
Use the following options to reboot a VM:
-
reboot: Gracefully reboots a running VM, sending the ACPI signal. -
reboot --hard: Performs a ‘hard’ reboot.
Note
VMs on reboot always recontextualizes the data from the VM template therefore changes made to the environment(initially contextualized) will be restored to the ones defined in the context variables of the VM template.
Delaying VM Instances
The deployment of a PENDING VM (e.g. after creating or resuming it) can be delayed with:
hold: Sets the VM to hold state. The scheduler will not deploy VMs in the hold state. Please note that VMs can be created directly on hold, using ‘onetemplate instantiate –hold’ or ‘onevm create –hold’.
Then you can resume it with:
- release: Releases a VM from hold state, setting it to pending. Note that you can automatically release a VM by scheduling the operation as explained below
Attaching/Detaching an NIC
New NICs can be hot-plugged directly and user can continue their work without even worrying about restarting the VM. To attach a new navigate to the desired VM select Network tab and click on 
Example

Warning
Although contextualization runs automatically with every change made to the VM, some VMs with specific OS, such as Windows, must be turned off and back on for the changes to take effect. In this context it means that if a new NIC is attached to a Windows VM while the VM is running, the network configuration of the new NIC will not be automatically set.
Disk Save As
Virtual Machine's virtual disks can be saved as a new image. This new image can be used to create a new template or be attached to an existing VM.
To export the VM's virtual disk as an image go to Storage tab inside the VM's view and click the Save As icon. This action can be done live, or with the VM powered down. It will create a new image out of the saved virtual disk and can be located in Storage > Images.
Attach disk
New disks can be attached to running or powered off VMs. To attach a new virtual disk to the VM go to Storage tab inside the VM's view and click the Attach disk button.
Note
LXD containers can not have volatile disks or empty datablocks attached.
Save a VM Instance
Any VM can be saved as a new template before it is destroyed. To do so, the user has to poweroff the VM first and then use the save operation.
This action clones the VM source Template, replacing the disks with snapshots of the current disks (see the disk-snapshot action). If the VM instance was resized, the current capacity is also used. NIC interfaces are also overwritten with the ones from the VM instance, to preserve any attach/detach action.
This feature is compatible with both KVM and LXD hypervisors.
Understanding Virtual Machine Lifecycle
During any modification/initialization or any other task a VM displays its status and to have complete information and control over User’s running VMs it is important to understand these states. Admin can view the status on Instances -> VMs. While a user can view state by heading over to the VMs tab on the portal and hovering over the status icon.
Following is a descriptive table that defines status of a VM.
| Short state | State | Meaning |
|---|---|---|
| pend | Pending | By default a VM starts in the pending state, waiting for a resource to run on. It will stay in this state until the scheduler decides to deploy it, or the user deploys it using the onevm deploy command. |
| hold | Hold | The owner has held the VM and it will not be scheduled until it is released. It can be, however, deployed manually. |
| clon | Cloning | The VM is waiting for one or more disk images to finish the initial copy to the repository (image state still in lock). |
| prol | Prolog | The system is transferring the VM files (disk images and the recovery file) to the host in which the virtual machine will be running. |
| boot | Boot | HyperCX is waiting for the hypervisor to create the VM. |
| runn | Running | The VM is running (note that this stage includes the internal virtualized machine booting and shutting down phases). In this state, the virtualization driver will periodically monitor it. |
| migr | Migrate | The VM is migrating from one resource to another. This can be a life migration or cold migration (the VM is saved, powered-off or powered-off hard and VM files are transferred to the new resource). |
| hotp | Hotplug | A disk attach/detach, nic attach/detach operation is in process. |
| snap | Snapshot | A system snapshot is being taken. |
| save | Save | The system is saving the VM files after a migration, stop or suspend operation. |
| epil | Epilog | In this phase the system cleans up the Host used to virtualize the VM, and additionally disk images to be saved are copied back to the system datastore. |
| shut | Shutdown | HyperCX has sent the VM the shutdown ACPI signal, and is waiting for it to complete the shutdown process. If after a timeout period the VM does not disappear, HyperCX will assume that the guest OS ignored the ACPI signal and the VM state will be changed to running, instead of done. |
| stop | Stopped | The VM is stopped. VM state has been saved and it has been transferred back along with the disk images to the system datastore. |
| susp | Suspended | Same as stopped, but the files are left in the host to later resume the VM there (i.e. there is no need to re-schedule the VM). |
| poff | PowerOff | Same as suspended, but no checkpoint file is generated. Note that the files are left in the host to later boot the VM there. When the VM guest is shutdown, HyperCX will put the VM in this state. |
| unde | Undeployed | The VM is shut down. The VM disks are transfered to the system datastore. The VM can be resumed later. |
| fail | Failed | The VM failed. |
| unkn | Unknown | The VM couldn’t be reached, it is in an unknown state. |
| clea | Cleanup-resubmit | The VM is waiting for the drivers to clean the host after a recover --recreate action |
| done | Done | The VM is done. VMs in this state won’t be shown with onevm list but are kept in the database for accounting purposes. You can still get their information with the onevm show command. |
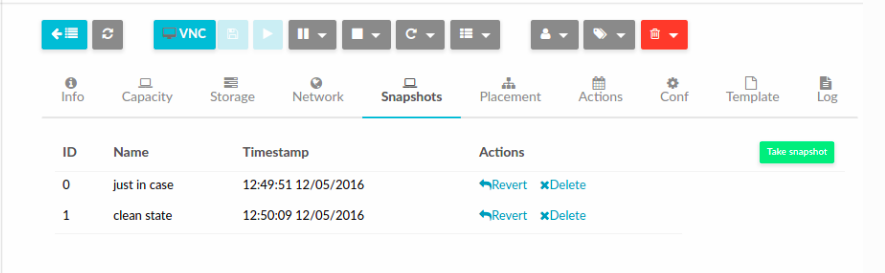
VM Snapshots
You can create, delete and restore snapshots for running VMs. A snapshot will contain the current disks and memory state.
At the moment this feature is only available for KVM, it will soon be available for LXD. Please take into consideration the following limitations:
-
The snapshots are lost if any life-cycle operation is performed, e.g. a suspend, migrate, delete request. -
Snapshots are only available if all the VM disks use the qcow2 driver.
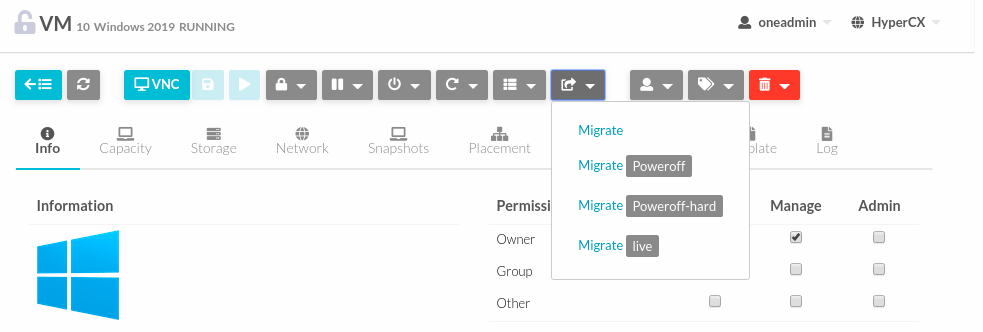
Migrating VMs
It is possible to migrate VMs from one node to another "live" within the same cluster, that is, without shutting down the VM.
There are 2 supported methods:
- Migrate: The VM will be gracefully powered down.
- Migration
Live: The VM will be live migrated, the state will not be lost.
Warning
Containers do not currently support live migration. This feature is being implemented by a project called CRIU.
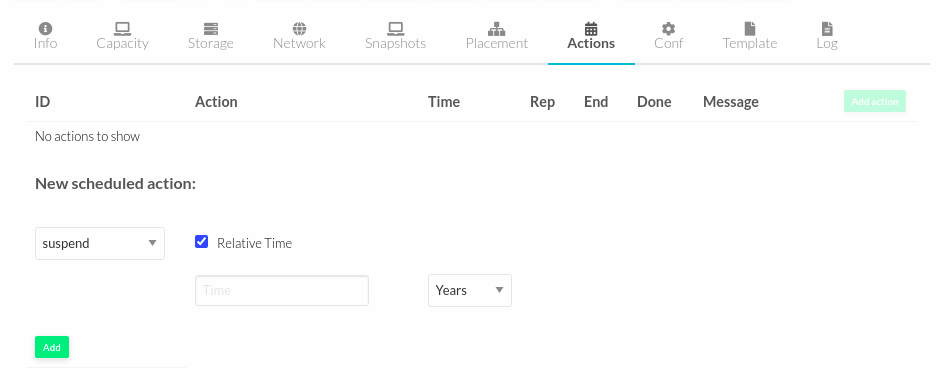
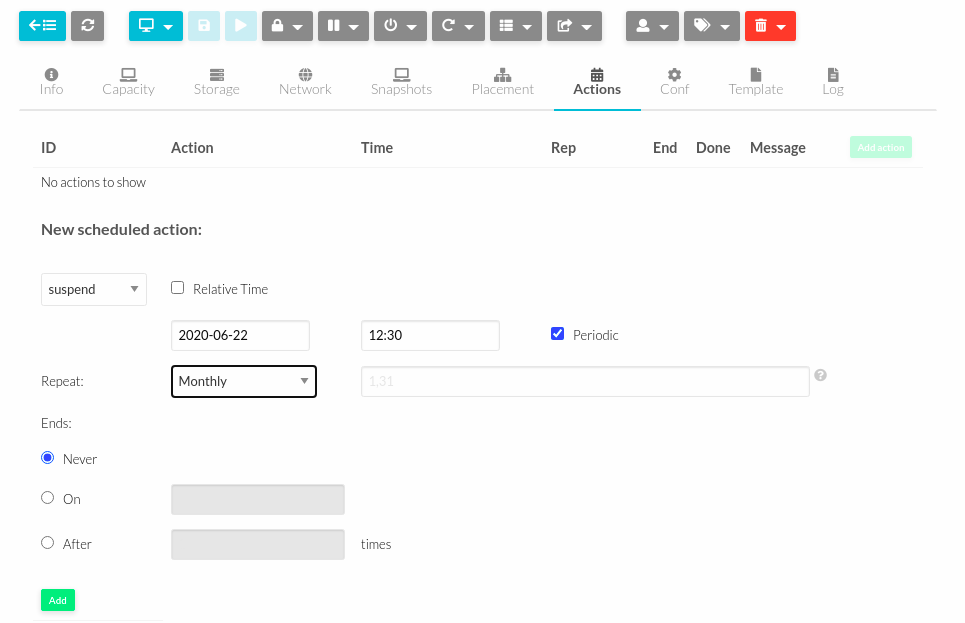
Scheduled Actions
Two types of scheduled actions are supported: punctual and relative actions. Punctual actions can also be periodic.
One-Time Punctual Actions
Allowing users to delay the actions until the given date and time. Here is an usage example:
Periodic Punctual Actions
To schedule periodic actions just enable check periodic
These are the periodic actions that can be carried out:
- Weekly: defines a weekly periodicity, so, the action will be execute all weeks, the days that the user defines.
- Monthly: defines a monthly periodicity, so, the action will be execute all months, the days that the user defines.
- Yearly: defines a yearly periodicity, so, the action will be execute all year, the days that the user defines.
- Hourly: defines a hourly periodicity, so, the action will be execute each ‘x’ hours.
- End: defines when you want that the relative action finishes.
Relative Actions
Scheduled actions can be also relative to the Start Time of the VM. That is, it can be set on a VM Template, and apply to the number of seconds after the VM is instantiated.
This functionality is present graphically in HyperCX in the VM Template creation and update dialog, and in the VM Actions tab:
These are the commands that can be scheduled:
- terminate [--hard]
- undeploy [--hard]
- hold
- release
- stop
- suspend
- resume
- delete
- delete-recreate
- reboot [--hard]
- poweroff [--hard]
- snapshot-create